Secure application from bot using HMS Core service Safety Detect SDK

What is Safety Detect?
Safety Detect is one of the HMS ecosystem that provide a robust security capabilities and multiple security features for Huawei application without compromising user experience. There are 5 security features provided as below:
- SysIntegrity: Checks whether the device running your app is secure, for example, whether it is rooted.
- AppsCheck: Obtains a list of malicious apps.
- URLCheck: Determines the threat type of a specific URL.
- UserDetect: Checks whether your app is interacting with a fake user (captcha).
- WifiDetect: Checks whether the Wi-Fi to be connected is secure.
For more information, can refer here.
What is UserDetect API?
UserDetect is one of the Safety Detect features. It use real-time risk analysis engine to detect whether the current user interacting with the app are fake user or a robot. This features can help developers to prevent batch registration, crawlers and etc on their application.
How UserDetect Works?
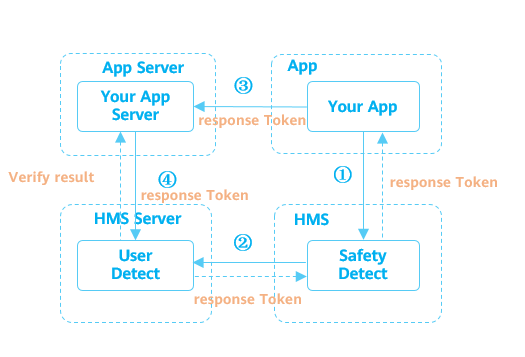
The UserDetect API works as per high level diagram. After integrating with SafetyDetect SDK, the application will trigger the UserDetect API. SafetyDetect will evaluates risks assessment of the device running in the app. If the risk level is medium or high detected, the SDK will prompt the user to enter a verification code and sends a response token to the application. When the application receive the response token, application must submit a request to the application server to validate and make sure the response token are valid or not.
Implementation in Laravel
Well, in this experiment we will try to create a validation rule in Laravel to validate the validity of the response token received from the mobile app.
Please note that this tutorial wont cover full mobile integration with SafetyDetect SDK. Only the snippet of the sample code will be shown.
Here are the steps:
- Create Project in in Huawei Developer Console
- Enable UserDetect API in Project
- Mobile App Integration Preparation
- Create OAuth Credentials
- Configure Environment file in Laravel
- Create Validation Rule
- Add Validation rule to Register Controller
- Testing and Validation
Lets get started
Create Project in in Huawei Developer Console
In order to use Huawei SDK ecosystem, you must have a Huawei developer account first. If you already have, you might want to skip this step.
Login into your Huawei console.
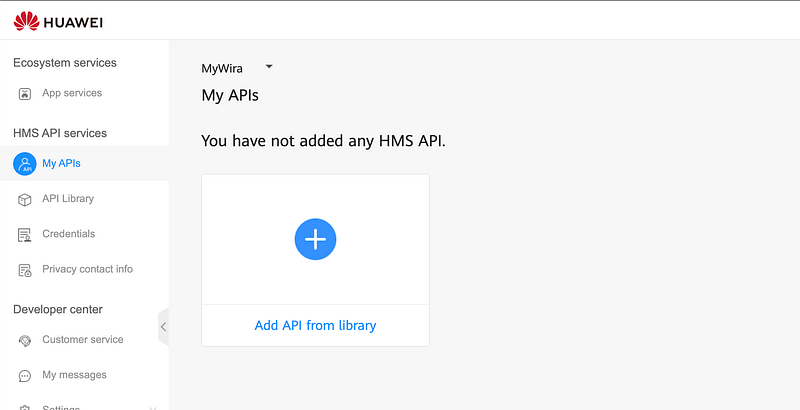
Click My APIs at the sidebar and click at the dropdown at top of My APIs title.
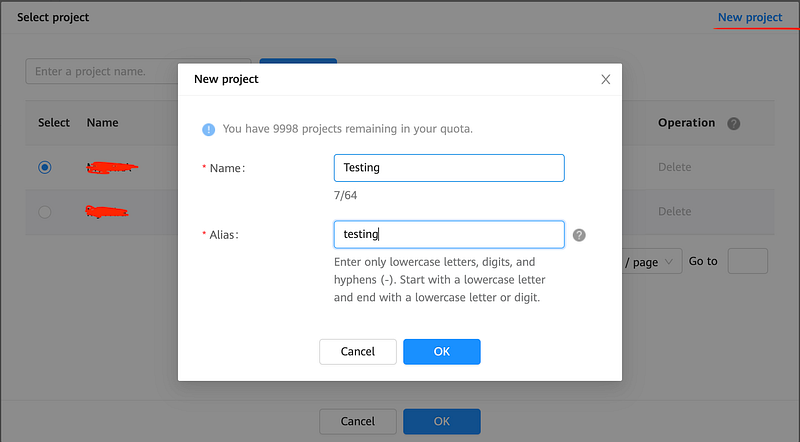
Click on new project and fill in the detail. If you are using existing project, please proceed to the next step.
Enable UserDetect API in Project
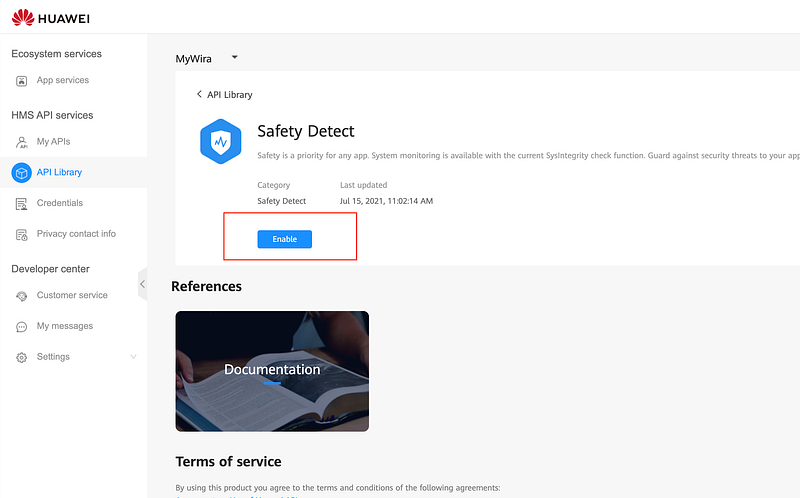
To use SafetyDetect SDK, we need to enable the API for the selected project. Click to API Library and search for “Safety Detect”

Click on Safety Detect and click Enable button
If it is successful, you should see the API are enable in My APIs section.

Mobile App Integration Preparation
For mobile app preparation, please refer getting started tutorial here. There are some preparation before you start integrating your app with Safety Detect SDK. You may follow this steps.
- Configure app information in AppGallery Connect, including creating an app, generating a signing certificate fingerprint, configuring the signing certificate fingerprint, and enabling required services. Refer here.
- Integrate the HMS Core SDK into your app. Refer here.
- Before building the APK, configure the obfuscation configuration file to prevent the HMS Core SDK from being obfuscated. Refer here.
- Initializing UserDetect Integration.
5. Calling the UserDetect API named userDetection method to initiate a fake user detection request. The API will return a responseToken object. Normally, this method is triggered when a user click on submission button. Here are the sample code for calling this method as follows:
Now on the mobile part, you should able to get the response token and include it in your form submission.
If the UserDetect API has executed the onSuccess() method, the user has completed man-machine distinction. However, you still need to verify responseToken of the user on your app server.
Create OAuth Credentials
We need to create OAuth 2.0-based Authentication to obtain access token to be use to verify response token in server side. If you already have OAuth credentials, you may skip this step.

Click on Credentials and click on OAuth 2.0 client ID.

Click on Mobile App and fill all the required information for your application.
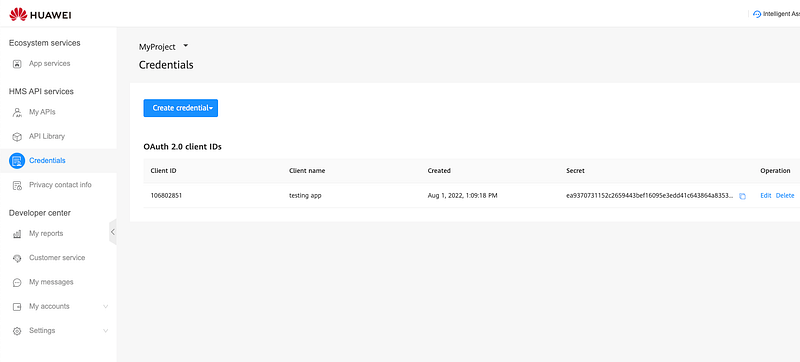
After successfully created, you may see Client ID and Client Secret created. Now we can move on to configure Laravel application.
Configure Environment file in Laravel
After we successfully create OAuth 2.0, move to your Laravel application. Go ahead to your .env file and fill the values to the correct keys.
HUAWEI_SECRET=XXXX
HUAWEI_ID=XXXX
After that, find a config file name services.php and add new lines with below code
<?php
return [
    ...
    'huawei' => [
         'app_id' => env('HUAWEI_ID'),
         'client_secret' => env('HUAWEI_SECRET'),
    ],
]
Create Validation Rule
Let’s create a rule named UserDetectRule with this command.
php artisan make:rule UserDetectRule
And the rule should be like this.
<?php
namespace App\Rules;
class UserDetectRule
{
    public function __construct() {}
    public function passes(string $attribute, mixed $value): bool
    {
        // user detect verification logic here
    }
    public function message(): string
    {
        return "Unable to validate safety detect captcha token";
    }
}
To write a logic rule, if we refer the documentation, to obtain the fake user detection result from response token received from client side, we need to perform the following steps on the server :-
Obtain an access token (OAuth authentication)
To obtain an access token, we need to call below API:
https://oauth-login.cloud.huawei.com/oauth2/v3/token (POST)
Should be the response are like this:-
{
  "access_token": "XXXXXXXXXX",
  "expires_in": 3600,
  "token_type": "Bearer"
}
Let’s convert it into our logic
$res = Http::asForm()
    ->post('https://oauth-login.cloud.huawei.com/oauth2/v3/token', [
        'grant_type' => 'client_credentials',
        'client_id' => config('services.huawei.app_id'),
        'client_secret' => config('services.huawei.client_secret'),
    ]);
$access_token = $res->json('access_token');
The validation rule should be like this.
Call the UserDetect Verification API to obtain the detection result
Now we need to obtain the fake user detection result from the Huawei UserDetect server by call below API.
https://hirms.cloud.huawei.asia/rms/v1/userRisks/verify?appId=XXXXXX (POST)
{
    "accessToken":"Retrieved from OAuth API",
    "response":"Retrieved from Response Token"
}
And the response should be like this
{
    "success":true,
    "challenge_ts":"2021-08-1T12:32:53+0800",
    "apk_package_name":"com.testing.app.mock"
}
Let’s convert it into our logic
$res = \Http::asJson()->post('https://hirms.cloud.huawei.asia/rms/v1/userRisks/verify?appId='.config('services.huawei.app_id'), [
    'accessToken' => $accessToken,
    'response' => 'RESPONSE TOKEN'
]);

return $res->json('success');
The validation rule now should be like this.
Note that, this rules only cater true or false condition based on the response. If you want to have extra validation, you may customize it
Add Validation rule to Register Controller
Add extra validation in your controller logic to use the UserDetectRule
public function register(Request $request)
{
    ....
    $request->validate([
        'email' => ['required'],
        'password' => ['required', 'confirmed'],
        'captcha-response' => ['required', new UserDetectRule]
    ]);
    ...
}
For more convenience, i recommended to put any validation in the Request class, so that your controller won’t get messy
Testing and Validation
By the time you submit the form, you will be able to utilized the SafetyDetect UserDetect feature functionality successfully. If it is not working, i suggest you to debug or dump the request from the verification API to see the error messages or error codes provided in the response.
Just like that. Simple~ Hope it helps
References
Access help documents, customer support, technical information, and business opportunities regarding HUAWEI Developers…developer.huawei.com
Found this helpful?
If this article saved you time or solved a problem, consider supporting — it helps keep the writing going.
Originally published on Medium.
View on Medium