Day by day, some fresh developers have problem on how to setup application on some dedicated server. For full stack developer or back-end developer, configuring a server should be consider as important knowledge
In this tutorial, LEMP stack will be used and deploy a simple Laravel project into server, which requires a few common steps. This tutorial based on my deployment in Digital Ocean and it might be similar to most other cloud server configuration.
Lets get started
First thing first after you install your OS or bought a server from any hosting is to configure administrative setting. This is the crucial part. You must create non-root user for your application to avoid major security issue.
So, go ahead to your terminal and ssh into your server
ssh root@SERVER_IP
You might receive a warning, just complete the login process. You will also be prompted to change the root password for the first time logon into the server.
Next is to set up a new user account with less privilege. Create new user by simply use adduser command. Let’s go for username “laravel”
adduser laravel
You will be asked some question and set new password.
Adding user `laravel’ …
Adding new group `laravel’ (1001) …
Adding new user `laravel’ (1001) with group `laravel’ …
Creating home directory `/home/laravel’ …
Copying files from `/etc/skel’ …
Enter new UNIX password:
Retype new UNIX password:
passwd: password updated successfully
Changing the user information for laravel
Enter the new value, or press ENTER for the default
    Full Name []: Laravel User
    Room Number []:
    Work Phone []:
    Home Phone []:
    Other []:
Is the information correct? [Y/n] Y
Run following command to confirm the user exist
cut -d: -f1 /etc/passwd | grep laravel
If the output show “laravel”, its success. Else, try to add again.
Now, we have a new user account with regular account privileges. However, we may sometimes need to do administrative tasks. We can assign “laravel” to have sudo group which can run a sudo command. Else, the user need to logout and login to root user account.
usermod -aG sudo laravel
Alright.. Let’s logout and login using new user.
ssh laravel@SERVER_IP
It will prompt you to enter password and done!
To enhance server’s security, i strongly recommend using SSH keys instead of using password authentication. Follow this guide on setting up SSH keys on Ubuntu to learn how to configure key-based authentication.
NGINX
Nginx (“Engine X”) is an open source modern and efficient web server.
Installation
sudo apt update
sudo apt install nginx nginx-extras -y
After done installing, we need to verify if the NGINX service is running
sudo service nginx status
// OR
sudo systemctl status nginx
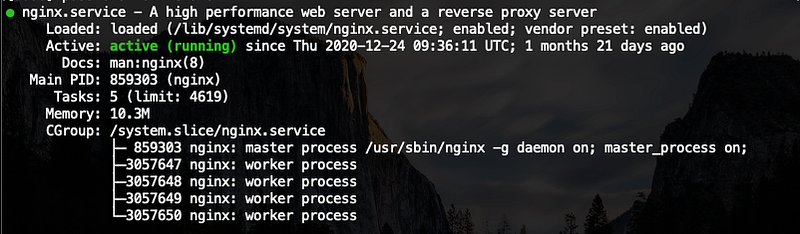
If in case the NGINX not running, we need to start it and enable it to load at startup
sudo service nginx start
sudo systemctl enable nginx
Setting Default Firewall (Optional)
Next, allowing NGINX traffic through UFW (default ubuntu firewall). Your choice if you want to enable ufw or not. If you have another firewall so called WAF (Web Application Firewall) at your transportation layer, this won’t be necessary.
If you want toggle the UFW status,
sudo ufw enable/disable
allow full NGINX which opens port 80 and 443.
sudo ufw allow 'Nginx Full'
You can verify it by
sudo ufw statusIts should output like this
Status: active
To                         Action      From
--                         ------      ----
OpenSSH                    ALLOW       Anywhere
Nginx Full                 ALLOW       Anywhere
Test NGINX browser
You can simply open a web browser, http://YOUR-IP-ADDRESS and you should see this display
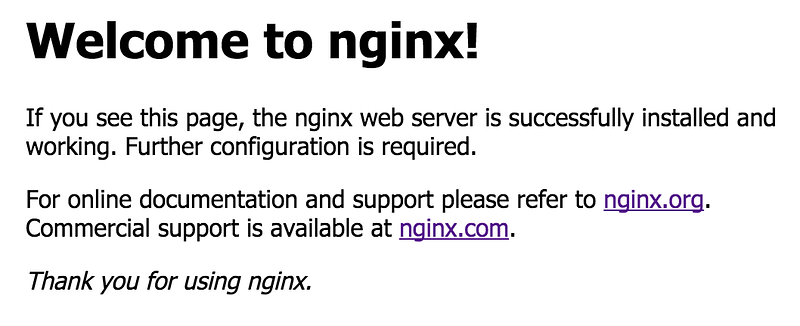
In case you don’t know your IP address, just run below command. It will show the IP address of the server
curl -4 icanhazip.com
Install PHP and Extensions
Installation
By the time this article written, i recommend you to use latest PHP 7.4 because some of extension not available yet in PHP 8. If you want PHP 8, make sure the extensions to want available. Downgrade could be a headache
sudo apt update
sudo apt install php php-fpm php-redis php-imagick php-curl php-bcmath php-xmlrpc php-gd php-mysql php-dom php-cli php-json php-common php-mbstring php-opcache php-readline php-zip php-soap php-mongodbphp-xml php-pear -y
Incase 7.4 not exist in current ubuntu, run following command
sudo apt-get update
sudo apt install software-properties-common -y
sudo add-apt-repository ppa:ondrej/php
sudo apt-get update
It will add custom repository and now try to run
sudo apt install php7.4 php7.4-gd php7.4-common -yVerify
To verify just run following command
php -m
php --ini
Install PHP Composer
Composer is a tool for dependency management in PHP. It allows you to declare the libraries your project.
The easy way to install composer is by using apt command
sudo apt update
sudo apt install composer -y
If it is not working, you can download it manually using php,
Download the composer installer
# php -r "copy('https://getcomposer.org/installer', 'composer-setup.php');"Verify the hash checksum whether the script is corrupted or not. It should show “Installer verified”
# HASH="$(wget -q -O - https://composer.github.io/installer.sig)"
# php -r "if (hash_file('SHA384', 'composer-setup.php') === '$HASH') { echo 'Installer verified'; } else { echo 'Installer corrupt'; unlink('composer-setup.php'); } echo PHP_EOL;"
Continue composer install to specific directory
# sudo php composer-setup.php --install-dir=/usr/local/bin --filename=composerVerify the composer, by running following command
composer
You should see the output like this
   ______
  / ____/___  ____ ___  ____  ____  ________  _____
 / /   / __ \/ __ `__ \/ __ \/ __ \/ ___/ _ \/ ___/
/ /___/ /_/ / / / / / / /_/ / /_/ (__  )  __/ /
\____/\____/_/ /_/ /_/ .___/\____/____/\___/_/
                    /_/
Composer version 2.0.8 2020-12-03 17:20:38
Usage:
    command [options] [arguments]
Install GIT — Version Control
Git — version control where basically all your code located
Installation
sudo apt update
sudo apt install git -y
Verify the installation by typing the following command which will print the Git version:
git --versionYou might need to setup the git config for user detail
git config --global user.name "YOUR NAME"
git config --global user.email "YOUR EMAIL"
Install MySQL Server (Optional)
You can install any preferred DB you want. It’s not restricted to MySQL only. If you are using remote DB (not same server), you can skip this
Installation
sudo apt update
sudo apt install mysql-server -y
Once installed, mysql service should started automatically. To verify it, run following command
sudo systemctl status mysql
// OR
sudo service mysql status
You should see following output if mysql is running
● mysql.service - MySQL Community Server
Loaded: loaded (/lib/systemd/system/mysql.service; enabled; vendor preset: enabled)
Active: active (running) since Tue 2021-02-02 06:47:03 +08; 1 weeks 6 days ago
Main PID: 5581 (mysqld)
Tasks: 34 (limit: 1151)
CGroup: /system.slice/mysql.service
        └─5581 /usr/sbin/mysqld --daemonize --pid-
          file=/run/mysqld/mysqld.pid
Feb 02 06:47:02 ubuntu-s-1vcpu-1gb-sgp1-01 systemd[1]: Starting MySQL Community Server...
Feb 02 06:47:03 ubuntu-s-1vcpu-1gb-sgp1-01 systemd[1]: Started MySQL Community Server.
Configuration
After install completed, we need to secure the installation. We need to set root password, constraints and privileges. Run following command,
sudo mysql_secure_installationIt will prompt you to set to set new password. Make sure you read before you proceed. Next, by default, to access the mysql by simply sudo mysql and we don’t want that to happen.
So, follow this step
sudo mysql
Root user does in fact authenticate using the auth_socket plugin. To configure the root account to authenticate with a password. Please change your_new_root_password to a strong password.
ALTER USER ‘root’@’localhost’ IDENTIFIED WITH mysql_native_password BY ‘your_new_root_password’;
Then, refresh acknowledges the server to reload the grant tables and make new changes by running following command
FLUSH PRIVILEGES
At this point, you are no longer be able to access MySQL with the sudo mysql command used previously. Instead, you must run the following:
sudo mysql -u root -p
Create user for specific database access
You might need to configure specific user that can only access specific database. This will minimize data breach if attackers able to retrieve database credentials. Don’t use root user for your application.
So, login to root user
sudo mysql -u root -p
mysql will prompt to enter root password. Then create a user for example “admin_laravel”
CREATE USER 'admin_laravel'@'localhost' IDENTIFIED BY 'your_strong_password';
Then, create a database
CREATE DATABASE DATABASE_NAME DEFAULT CHARACTER SET utf8 COLLATE utf8_unicode_ci;
Assign user to your new database and flush priviledge
GRANT ALL ON DATABASE_NAME.* TO 'admin_laravel'@'localhost' IDENTIFIED BY 'password';
FLUSH PRIVILEGES
Done setup mysql. Alternately, you can set all of this configuration just using GUI like Sequal Pro. 😬
Install Redis (Optional)
If you are using remote Redis (not same server), you can skip this.
Installation
sudo apt update
sudo apt install redis-server
Verify
Start by checking that the Redis service is running:
sudo systemctl status redis
the output should be like following
● redis-server.service - Advanced key-value store
Loaded  : loaded (/lib/systemd/system/redis-server.service; enabled; vendor preset: enabled)
Active  : active (running) since Mon 2020-12-21 03:32:16 UTC; 1 months 26 days ago
Docs: http://redis.io/documentation,
      man:redis-server(1)
Main PID: 941 (redis-server)
Tasks   : 5 (limit: 9451)
Memory  : 825.4M
CGroup  : /system.slice/redis-server.service
         ├─   941 /usr/bin/redis-server 127.0.0.1:6379
         └─917057 redis-rdb-bgsave 127.0.0.1:6379
When you run
redis-cli PING
it should reply back “PONG”.
Install Supervisor (Optional)
Supervisor is an open source process management system. If a process crashes for any reason, Supervisor will restart it. This will keep your queue:work running smoothly. (Not available in windows)
Installation
sudo apt install supervisor -yConfigure
Configuration file located in /etc/supervisor/conf.d directory. Let’s create a config file project-worker.conf and fill the config with belows
For Laravel queue,
[program:project-worker]
process_name=%(program_name)s_%(process_num)02d
command=php PROJECT_DIRECTORY/artisan queue:work --sleep=3 --tries=3
autostart=true
autorestart=true
user=YOUR_USER //don't use root
numprocs=8
redirect_stderr=true
stdout_logfile=PROJECT_DIRECTORY/storage/logs/worker.log
For Laravel horizon,
[program:project-worker]
process_name=%(program_name)s_%(process_num)02d
command=php PROJECT_DIRECTORY/horizon
autostart=true
autorestart=true
user=YOUR_USER //don't use root
redirect_stderr=true
stdout_logfile=PROJECT_DIRECTORY/storage/logs/worker.log
Any extra attributes value you may refer supervisorctl documentation section
Save the config and run below command
sudo supervisorctl reread

sudo supervisorctl update

sudo supervisorctl start all
Setup Laravel Application
You don’t need laravel installer in server. All you need is to pull your project code from GIT and place it /var/www/ directory which is the usual location for web applications running on Nginx.
Create directory
Firstly, create a directory any name you want inside /var/www/ directory. Let’s say myproject folder. Run following command,
cd /var/www
sudo mkdirmyproject
sudo chown user:www-datamyproject
cd laravel
Clone project
Now, get your laravel project from your GIT and clone it into the myproject folder
git clone ssh://git@gitlab.domain.com:22/project/project.git .
After clone, do the basic thing like first time install laravel. Create a .env file if not exist and fill it with your environment.
Configure
Run composer install to install all required dependencies.
Note that, don’t composer update in server because it’s consume a lot of memory and code conflict will occurred.composer install
Wait until finish. It may take some time depending how many dependencies you have. Once finished, migrate your database
php artisan migrate
php artisan db:seed //if required
Don’t forget to symlink your storage folder
php artisan storage:link
File Permission (Important part)
I found that there is a lot of developer have issues which files/folders permission when setup a project in staging/production server. Here is where i solved every time i faced permission issues in ubuntu server
Most important, need to make sure the storage folder and bootstrap/cache is in proper permission. The application directory is owned by our system user and is readable but not writable by the web server. It’s correct but there are few directories that need special treatment.
First, let’s change the group ownership of the storage and bootstrap/cache directories to www-data.
cdmyproject
sudo chgrp -R www-data storage bootstrap/cache
sudo chmod -R ug+rwx storage bootstrap/cache
Second, make sure all the files in 664 or 644 and 775 or 755 for folders. In my case :-
cd ..
sudo findmyproject-type f -exec chmod 664 {} \;
sudo findmyproject-type d -exec chmod 775 {} \;
Finally, there is a case that your application can’t write/read your logs file. But first, delete all log file inside storage/logs/ folder
cdmyprojectsudo chmod g+s storage/logs/
sudo rm -rf storage/logs/*.log
sudo setfacl -d -m g::rwx storage/logs/
This will inherit the permission from the parent folder
Setup CRON (Optional)
The Cron daemon is a built-in Linux utility that runs processes on your system at a scheduled time. Its useful when you want to schedule you task for certain amount of time.
Run following command to activate.
crontab -e
I recommend you not to run this command usingsudo. If your script expose to Remote code injection, the attacker easily can penetrate your server easily because of your script is underroot
You may be prompted to choose which editor you want to use. Choose either nano or vim.
After that, write the file and put following code at the last line
* * * * * php /data/www/myproject/artisan schedule:run >> /dev/null 2>&1Then, save and exit. Crontab will automatically run every minute.
Setting Up NGINX and TLS
Now supposedly, everything is in order now. Now let’s create a new virtual host configuration file at /etc/nginx/sites-available. For standardize, every time you want to create new host configuration, name it as your domain name. Ok, Create a config file name as project.com.my and paste below script into it
server {listen 80 default_server;
listen [::]:80 default_server;server_name server_domain_or_IP;root /var/www/myproject/public;add_header X-XSS-Protection "1; mode=block" always;
add_header X-Content-Type-Options nosniff always;
add_header X-Frame-Options "DENY" always;
add_header Referrer-Policy no-referrer-when-downgrade always; index index.html index.htm index.php; more_set_headers "Server: My Server"; // Optional
server_tokens off;location = /favicon.ico {
charset utf-8;
access_log off; log_not_found off;
}location / {include snippets/fastcgi-php.conf;
try_files $uri $uri/ /index.php?$query_string;
}
location ~ \.php$ {
fastcgi_pass unix:/var/run/php/php7.4-fpm.sock;
}
location ~ /\.(?!well-known).* {
deny all;
}
}
Adjust the highlighted values to align with your own configuration. Save and close the file when you’re done editing.
Now, you have to enable the new configuration file by creating a symbolic link from this file to the /etc/nginx/sites-enabled directory.
sudo ln -s /etc/nginx/sites-available/project.com.my /etc/nginx/sites-enabled/To confirm that the configuration doesn’t contain any syntax errors, you can use:
sudo nginx -t
You should see output like this:
nginx: the configuration file /etc/nginx/nginx.conf syntax is ok
nginx: configuration file /etc/nginx/nginx.conf test is successful
And finally reload Nginx to take the changes into account.
sudo systemctl reload nginx
Now that Nginx is configured to serve the your Laravel application. Making sure that your deployment is working at this point is easy. Simply visit http://IP_ADDRESSin your browser.
Configure HTTPS
It is recommended to serve the application through HTTPS. This will make sure that all communication between the application and its visitors is encrypted. We will use free certificate authority called Lets Encrypt.
All you need is to install certbot.
sudo add-apt-repository ppa:certbot/certbot
sudo apt update
sudo apt install certbot python-certbot-nginx
After install completed, here is Https setup get easy. Run following command,
sudo certbot --nginx -d project.com.my
And answer all the question prompted. When certbot ask to choose whether to redirect HTTP traffic to HTTPS — 1 (no redirect, no further changes to the server) or 2 (redirect all requests to HTTPS), i recommend to choose number 2.
Once completed, open host config file earlier again and you will see some changes by certbot
server {project.com.my
server_name;root /var/www/myproject/public;add_header X-XSS-Protection "1; mode=block" always;
add_header X-Content-Type-Options nosniff always;
add_header X-Frame-Options "DENY" always;
add_header Referrer-Policy no-referrer-when-downgrade always; index index.html index.htm index.php; more_set_headers "Server: My Server"; // Optional
server_tokens off;location = /favicon.ico {
charset utf-8;
access_log off; log_not_found off;
}location / {include snippets/fastcgi-php.conf;
try_files $uri $uri/ /index.php?$query_string;
}
location ~ \.php$ {
fastcgi_pass unix:/var/run/php/php7.4-fpm.sock;listen [::]:443 ssl ipv6only=on;
}
location ~ /\.(?!well-known).* {
deny all;
}
listen 443 ssl;
ssl_certificate /etc/letsencrypt/live/project.com.my/fullchain.pem;
ssl_certificate_key /etc/letsencrypt/live/project.com.my/privkey.pem;
include /etc/letsencrypt/options-ssl-nginx.conf;
ssl_dhparam /etc/letsencrypt/ssl-dhparams.pem;}server {
if ($host = project.com.my) {
return 301 https://$host$request_uri;
} # managed by Certbot listen 80;
listen [::]:80;
server_name project.com.my;
return 404; # managed by Certbot
}
To confirm that the configuration doesn’t contain any syntax errors, you can use:
sudo nginx -t
And finally reload Nginx to take the changes into account.
sudo systemctl reload nginx
Making sure that configuration is correct. If you choose “redirect to https” earlier, if visitor open your website using http, it will automatically redirect to https
Verifying Certbot Auto-Renewal
The Lets Encrypt cert will expired every 3 months. So, you need to run a task scheduler to update it automatically. To test the renewal process, you can do a dry run with certbot:
sudo certbot renew — dry-run
If you see no errors, you’re all set. When necessary, Certbot will renew your certificates and reload Nginx to pick up the changes. If the automated renewal process ever fails, Lets Encrypt will send a message to the email you specified, warning you when your certificate is about to expire.
Conclusion
Try and error is best the to gain experiences 😎
Hope thats help you……..