MySQL Source-Replica using GTIDs method

In Data management, one of the most important things that we want to achieve is High Availability. In term of High Availability, the system provide redundancies and able to operate continuously without failing for a designated period of time which improve data availability, scalability, and overall performance.
So, when we working with databases, replications into multiple databases are very important and useful because it increases efficiency at the time of data access. In most cases, replica database are act as Read-Only database because of to reduced the burden on write transaction on source database. Plus, knowing how to replicate your database is an important skill to have in your arsenal.
MySQL is an open-source and one of the most widely used relational database management systems. One of the backup recovery features is mysql replication. It’s allow you to maintain multiple copies of MySQL data. All data in the source server will be synced to the replica server automatically. There are different methods of replication
- Replicate source binary logs. The traditional method is based on replicating events from the source’s binary log and requires the log files and positions in them to be synchronized between source and replica.
- Global transaction identifiers. GTIDs is a transactional and does not require working with log files or positions within these files which greatly simplifies many common replication tasks.
In this tutorial outlines how to configure a MySQL on one server as a source database and then configure a MySQL on another server to function as its replica using GTIDs method.
Why using Global transaction identifiers?
Replication using GTIDs guarantees consistency between source and replica as long as all transactions committed on the source have also been applied on the replica. To ensure a smooth, consistent, and fault-tolerant replication, the replica will then inform the source of the MySQL GTIDs that were a part of the execution which helps the source node identify if any transaction did not take place. The source node then informs the replica to carry out the left-over transactions and thereby ensures that data replication takes place accurately.
Tutorial Outlines
In this tutorial, we will cover the following steps
- Create 2 Droplet server in Digital Ocean (Optional)
- Configure initial setup of each server
- MySQL 8 installation
- Configure Source Database Server
- Create a Replication User
- Configure Replica Database Server
- Initialize Replication on Slave Server
- Verify Replication Process
- Remotely access both database server (Optional)
This tutorial are meant for the developer who want to manually configure MySQL Replication without using any managed services. It is highly recommended to use Managed Services provided by the Cloud provider like Digital Ocean, AWS, Alibaba and etc.
Prerequisites
To complete this tutorial, you will need
- 2 Server running latest Ubuntu 20.04 or later with minimum specification 1 vCPU 1GB RM 25GB Disk.
- Make sure the servers already authorized your SSH public key.
- Note down the IP for source and IP for replica server to avoid confusion.
Notes
Be aware that the procedure outlined in this tutorial involves the MySQL installation on one server as the source database and then configuring the MySQL installation on the other server to be the source’s replica. To keep things clear, any commands that must be run on the source database’s server will have a prefix $source, like this:
$source >
Likewise, any commands that must be run on the replica MySQL instance’s server will have a prefix $replica:
$replica >
Else, any commands that must be run on both server will have a prefix >:
>
Step 1 — Create 2 Droplet server in Digital Ocean (Prerequisites)
Open digital ocean control panel and go to Create Droplet

Select the latest Ubuntu version image because this tutorial are meant to Ubuntu.

Choose your preferred plan. For tutorial purpose, i recommended you to choose the minimum spec.

Choose the nearest region to your country
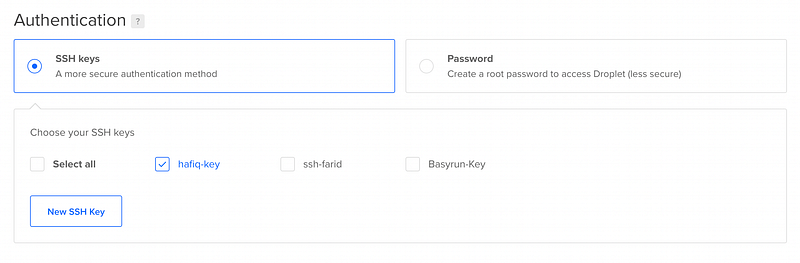
Choose SSH key (Prerequisites) instead of password for more secure authentication method.
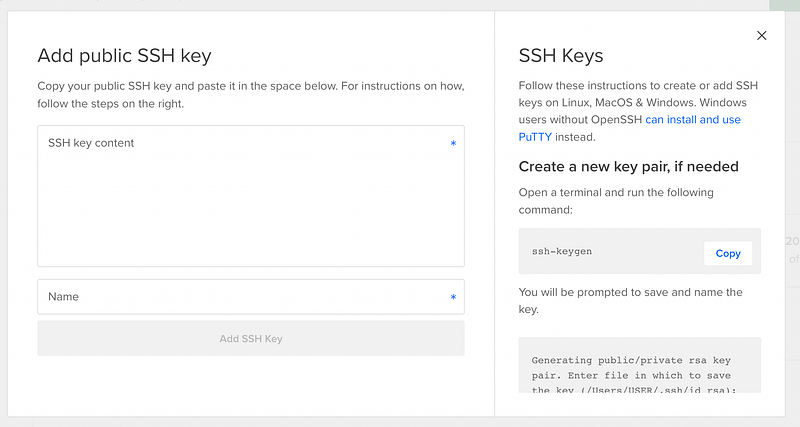
If none existed, click “new SSH Key” and enter your public key.

Finally, choose 2 droplets or more based on your preferred. Give the name for each droplet, one for source and one for replica, so that you won’t be confuse later. Then, click create droplet.
Step 2 — Configure initial setup of each server
Create non-root user
First thing first after you install your OS or bought a server from any hosting is to configure administrative setting. This is the crucial part. You must create non-root user for your application to avoid major security issue.
So, go ahead to your terminal and ssh into your both source and replica server
> ssh root@SERVER_IP
The next step is setting up a new user account with reduced privileges for day-to-day use. Create new user by simply use adduser command. For this, we will named the user as “administrator”
> adduser administrator
You will be asked some question and set new password.
Adding user `administrator’ …
Adding new group `administrator’ (1001) …
Adding new user `administrator’ (1001) with group `administrator’ …
Creating home directory `/home/administrator’ …
Copying files from `/etc/skel’ …
Enter new UNIX password:
Retype new UNIX password:
passwd: password updated successfully
Changing the user information for administrator
Enter the new value, or press ENTER for the default
    Full Name []: Administrator
    Room Number []:
    Work Phone []:
    Home Phone []:
    Other []:
Is the information correct? [Y/n] Y
Run following command to confirm the user exist
> cut -d: -f1 /etc/passwd | grep administrator
If the output show “administrator”, its success. Else, try to add again.
Now, we have a new user account with regular account privileges. However, we may sometimes need to do administrative tasks. We can assign “administrator” to have sudo group which can run a sudo command. Else, the user need to logout and login to root user account.
> usermod -aG sudo administrator
Now that you have a regular user for daily use BUT you need to make sure that the regular user are able to SSH into the account directly. To log in as your regular user with an SSH key, you must add a copy of your local public key to your new user’s ~/.ssh/authorized_keys file.
Since your public key is already in the root account’s ~/.ssh/authorized_keys file on the server, you can copy that file and directory structure to your new user account using your current session.
The simplest way to copy the files with the correct ownership and permissions is with the rsync command. This command will copy the root user’s .ssh directory, preserve the permissions, and modify the file owners, all in a single command.
> rsync — archive — chown=administrator:administrator ~/.ssh /home/administrator
After that, Try to logout and login using new user.
> ssh administrator@SERVER_IP
You should be able to connect to your both server with the new user account. Remember, if you need to run a command with administrative privileges, type sudo before the command. You will be prompted for your regular user’s password when using sudo for the first time each session.
Setup UFW Firewall
You will need to make sure that the firewall allows SSH connections so that you can log into your server next time. Allow these connections by typing:
> ufw allow OpenSSH
Now enable the firewall by typing:
> ufw enable
A UFW rule that permits connections from your replica over the source’s firewall must be included. You can accomplish this by running the following command on your source server. This command permits any connections that originate from the IP address of the replica server.
$source > sudo ufw allow from replica_server_ip to any port 3306Following that, you won’t need to make any changes to the replica’s firewall rules, since the replica server won’t receive any incoming connections and the outgoing connections to the source MySQL server aren’t blocked by UFW. BUT, in most cases, your application might be located in somewhere else and want to access the read-only replica database. It is recommended to whitelist the IP of the incoming connection IP address. For example :-
$replica > sudo ufw allow from which_server_ip to any port 3306Step 3— MySQL 8 installation
Now, you need to install MySQL 8 on both server. Install MySQL by typing the following command:
> sudo apt install mysql-server
The MySQL database software is now installed, but its configuration is not yet complete. Before proceed to secure mysql installation, you will need to set a MySQL root password — Else, your will receive this error
Failed! Error: SET PASSWORD has no significance for user ‘root’@’localhost’ as the authentication method used doesn’t store authentication data in the MySQL server
Log into mysql command.
> sudo mysqlThen run command ALTER Query to change the authentication parameters.
ALTER USER 'root'@'localhost' IDENTIFIED WITH mysql_native_password by 'YOUR_STRONG_PASSWORD_IS_PASSWORD';And now, you are able to run mysql_secure_installation command.
> sudo mysql_secure_installation
You will be asked, whether you want to change current root password. Just press N. For the rest of the questions, you should press Y. This will remove some anonymous users and the test database, disable remote root logins, and load these new rules so that MySQL immediately respects the changes we have made. Once you confirm this on your own server, you can exit the MySQL shell. After configuring your root MySQL user to authenticate with a password, you’ll no longer be able to access MySQL with the sudo mysql command used previously. Instead, you must run the following:
> mysql -u root -p
At this point, your MySQL is now set up and you can move on to configure Source server.
Step 4— Configure Source Server
In order for your source MySQL database to begin replicating data, you need to make a few changes to its configuration. The configuration can be found in the /etc/mysql/mysql.conf.d/ directory named mysqld.cnf. Open the file :-
$source > sudo nano /etc/mysql/mysql.conf.d/mysqld.cnf
Add and modify the file to this configurations :-
[mysqld]
bind-address            = 0.0.0.0
server-id               = 1
gtid-mode               = ON
enforce-gtid-consistency
Why bind-address is 0.0.0.0? We want source database accepts TCP/IP connections on all server host IPv4 interfaces.
The server-id variable — defines as an identifier that MySQL uses internally to distinguish servers in a replication setup. Every server in a replication environment, including the source and all its replicas, must have their own unique server-id value.
The gtid-mode and enforce-gtid-consistency are required because of we are using GTIDs replication method.
After making these changes, save and close the file. If you used nano to edit the file, do so by pressing CTRL + X, Y, and then ENTER. Then restart the MySQL service by running the following command:
$source > sudo systemctl restart mysql
With that, this MySQL instance is ready to function as the source database which your other MySQL server will replicate. Before you can configure replica server, you need to create a dedicated MySQL user which will perform any actions related to the replication process.
Step 5— Create a Replication User
Each replica in a MySQL replication environment connects to the source database with a username and password. Replicas can connect using any MySQL user profile that exists on the source database and has the appropriate privileges. To do so, connect to the MySQL shell with the following command:
$source > mysql -u root -pProvide your MySQL root password, then run the following command to create a replication user.
mysql > CREATE USER replica@replica_server_ip IDENTIFIED WITH mysql_native_password BY 'YOUR_STRONG_PASSWORD_IS_PASSWORD';The above example will create a user named replica, but you can name yours whatever you’d like.
Next, grant REPLICATION SLAVE privileges to replication user. This privileges will enables the account to request updates that have been made to databases on the replication source server. To grant the privilege, run mysql command :-
mysql > GRANT REPLICATION SLAVE on *.* to replica@replica_server_ip;Next, flush the privileges to apply the changes :-
mysql > FLUSH PRIVILEGES;With that, you’ve finished setting up a replication user on your source database server. Now, you can move on to configure Replica server.
Step 6— Configure Replica Server
The changes on replica’s configuration similar to how you changed the source server. Open up the MySQL configuration file mysqld.cnf
$replica > sudo nano /etc/mysql/mysql.conf.d/mysqld.cnf
Add and modify the file to this configurations :-
[mysqld]
bind-address = 0.0.0.0
server-id = 2read_only = 1
gtid-mode = ON
enforce-gtid-consistency
Why enable read-only mode? Because we want to make the replica database as data retrieval and lessen the burden on source database. In other word, we want to make a query distribution between read and write.
After making these changes, save and close the file. If you used nano to edit the file, do so by pressing CTRL + X, Y, and then ENTER. Then restart the MySQL service by running the following command:
$replica > sudo systemctl restart mysql
With that, this MySQL instance is ready to function as the replica database. After that, we need to initialize the replication in replica server
Step 7— Initialize Replication on Replica Server
Now, The replica should be configured to use the source with GTID based transactions as the source for data replication and to use GTID-based auto-positioning rather than file-based positioning.
To start replicating data from your source, open up the the MySQL shell on your replica server:
$replica > sudo mysql -u root -p
From the prompt, run the following operation, which configures several MySQL replication settings at the same time. After running this command, once you enable replication on this instance it will try to connect to the IP address following SOURCE_HOST using the username and password following SOURCE_USER and SOURCE_PASSWORD, respectively.
You may want to type this command out in a text editor before running it on your replica server so that you can more easily replace all the relevant information:
mysql > CHANGEREPLICATIONTO SOURCE_HOST = 'source_server_ip',
mysql > SOURCE_PORT = 3306,
mysql > SOURCE_USER = 'YOUR_REPLICA_USER_NAME',
mysql > SOURCE_PASSWORD = 'YOUR_REPLICA_USER_PASSWORD',
mysql > SOURCE_AUTO_POSITION = 1;
It is now time to begin the slave process:
mysql > START REPLICA;incase you want to stop the replica, just run
mysql > STOP REPLICA;
Step 8— Verify Replication Process
If you entered all the details correctly, this instance will begin replicating any changes made to the database on the source.
You can see details about the replica’s current state by running the following operation in replica MySQL instance server. The \G modifier in this command rearranges the text to make it more readable:
mysql > SHOW REPLICA STATUS\G;
By running above mysql command, you should get the following output:
*************************** 1. row ***************************
Replica_IO_State: Waiting for source to send event
Source_Host: source_server_ip
Source_User: replica
Source_Port: 3306
Connect_Retry: 60
Source_Log_File: mysql-bin.000003
Read_Source_Log_Pos: 406
Relay_Log_File: mysql-slave-relay-bin.000002
...
...
...
Source_Server_Id: 1
Source_UUID: 82def8a9-e175-11ec-bb5d-02e328d8aa65
Source_Info_File: mysql.slave_master_info
...
...
Referring to the Replica_IO_State, it means the replica is now replicating data from the source. Any changes you make to the source database will be reflected on the replica MySQL instance. Any troubleshooting error will be inform in this replica status.
You can test this by creating a sample table on your source database and checking whether it gets replicated successfully. Open MySQL shell on your source server:
$source > mysql -u root -p
Lets create a database
mysql > CREATE DATABASE my_database DEFAULT CHARACTER SET utf8 COLLATE utf8_unicode_ci;
Next, verify all databases using the following command:
mysql > SHOW DATABASES;It should show output like below :
+--------------------+my_database
| Database |
+--------------------+
| information_schema |
| mysql |
| performance_schema |
||
| sys |
+--------------------+
Now, open MySQL shell on your replica server:
$replica > mysql -u root -p
Verify the created database using the following command:
mysql > SHOW DATABASES;and if replication is working as expected, this operation will return that name of the database in its output:
+--------------------+my_database
| Database |
+--------------------+
| information_schema |
| mysql |
| performance_schema |
||
| sys |
+--------------------+
If the operations failed to return the example database or data that you added to the source, it may be that you have an error somewhere in your replication configuration. In such cases, you could run the SHOW REPLICA STATUS\G operation to try finding the cause of the issue. Additionally, you can consult MySQL’s documentation on troubleshooting replication for suggestions on how to resolve replication problems.
Step 9 — Remotely access both database server (Optional)
For most cases, you might want to access using your database client such as Sequal PRO, Dbeaver or else. You need to create another specific user to access the database.
Run this mysql command on both server : -
CREATE USER 'my_user'@'localhost' IDENTIFIED WITH mysql_native_password BY 'YOUR_STRONG_PASSWORD_IS_PASSWORD';
GRANT ALL PRIVILEGES ON my_database.* TO 'my_user'@'%'
“GRANT ALL PRIVILEGES” are not recommended to use in production. This is just for the POC of this tutorial
After that, use your database client on your computer.

Conclusion
In this tutorial, you have learned how to set up MySQL Replication with DTIs. However, you are recommended to use Managed Services Database every hideous things are handled by Cloud provider.
By the way, when it comes to working with replication, you need to be an expert at MySQL to set up servers from scratch and manually configure several details.
Hope it helps 😀 ~~
References
MySQL is an open-source and one of the most widely used relational database management systems. Setting up a separate…arctype.com
Found this helpful?
If this article saved you time or solved a problem, consider supporting — it helps keep the writing going.
Originally published on Medium.
View on Medium

