Step by Step Intensive Guide — Installing Sonarqube 10 on Ubuntu Server in DigitalOcean Droplet
Introduction
SonarQube is a powerful open-source web-based tool designed for comprehensive code quality analysis. It excels in identifying security vulnerabilities across more than 20 programming languages while also conducting automatic assessments of code quality to pinpoint bugs and code odors.
Furthermore, SonarQube provides detailed reports on various aspects, including duplicated code, adherence to coding standards, unit test results, code coverage, code complexity, comment quality, bug identification, and security vulnerabilities.
In this guide, we will walk you through the process of installing SonarQube on Ubuntu 22.04 LTS, enabling you to harness the full potential of this tool for enhancing your code quality and security.
Create Server (Optional)
Before we install SonarQube, you’ll need a dedicated server with appropriate specifications to ensure optimal performance. We recommend using DigitalOcean for cost-efficient server. Follow these steps to create a server:
- Create a Droplet: Select ‘Ubuntu 22.04 LTS’ as the operating system image. It’s essential to use this version to ensure compatibility with SonarQube.
- Choose a Plan: For SonarQube, we recommend at least 4GB of RAM and 2 vCPUs for optimal performance. However, you can adjust this based on your needs.
- Review your selections, and when you’re ready, click the ‘Create Droplet’ button. DigitalOcean will provision your server.
Congratulations, you now have a DigitalOcean server with the appropriate specifications ready for SonarQube installation. In the upcoming steps, we’ll guide you through the installation process
Prepare the Server
When you first create a new server, you should perform some important configuration steps as part of the initial setup. These steps will increase the security and usability of your server and will give you a solid foundation for subsequent actions.
Step 1: Logging in as Root
When your new server is ready, you typically log in as the root user. To log into your server, you will need to know your server’s public IP address. You will also need the password or the private key for the root user’s account if you installed an SSH key for authentication. The command will look like this:
ssh root@your_server_ipReplace your_server_ip with your actual server's IP address.
Step 2: Run System Update
Performing the system update command to install the latest available security application updates on your ubuntu server is the first thing to do before anything else. Run following command:
sudo apt updateStep 3: Creating a New User
To enhance security, it’s advisable to create a new user with limited privileges for everyday tasks.
Use the following command to create a new user (replace new_username with your desired username):
adduser new_usernameAssign a strong password to the new user when prompted.
Next, granting administrative privileges to the new created user.
While the new user enhances security, you may need administrative privileges from time to time.
Use the following command to grant administrative (sudo) privileges to the new user
usermod -aG sudo new_usernameThis command adds the user to the sudo group, allowing them to execute commands with superuser privileges when needed.
Step 4: Setting Up a Firewall
A firewall helps protect your server by controlling network traffic. Here’s how to set up a basic firewall:
First, check if UFW is installed and active:
# sudo ufw statusEnsure SSH access is allowed so that you can connect to your server:
# sudo ufw allow OpenSSHTurn on the firewall.
# sudo ufw enableConfirm the firewall rules are set correctly:
# sudo ufw status

Status: active

To                         Action      From
--                         ------      ----
OpenSSH                    ALLOW       Anywhere
OpenSSH (v6)               ALLOW       Anywhere (v6)
Step 5: Enabling External Access for Your Regular User
To manage your server more securely, it’s a good practice to disable root login and use your regular user account for SSH access:
Open the SSH configuration file:
sudo nano /etc/ssh/sshd_configLook for the line that says PermitRootLogin yes and change it to PermitRootLogin no.
Save the file and restart the SSH service:
sudo systemctl restart sshNow, open up a new terminal session on your local machine, and use SSH with your new username:
ssh new_username@your_server_ipYou should be connected to your server with the new user account without using a password. Remember, if you need to run a command with administrative privileges, type sudo before the command like this:
sudo command_to_runYou will be prompted for your regular user’s password when using sudo for the first time each session (and periodically afterward).
Install Java OpenJDK 17
SonarQube depends on Java. For that, we’ll install OpenJDK 17 since the latest Sonarqube 10 support JDK 17+ (see requirement), which can be done with the command:
sudo apt install openjdk-17-jdkOnce Java OpenJDK is installed, verify the Java version using the following java command. You will see the output of the Java version that is installed on your system.
> java -version
openjdk 17.0.8.1 2023-08-24
OpenJDK Runtime Environment (build 17.0.8.1+1-Ubuntu-0ubuntu122.04)
OpenJDK 64-Bit Server VM (build 17.0.8.1+1-Ubuntu-0ubuntu122.04, mixed mode, sharing)
Setup Database
SonarQube supports multiple database systems such as PostgreSQL, Microsoft SQL Server, and oracle database. For this example, we will use PostgreSQL as the database for your SonarQube installation.
sudo apt install postgresql postgresql-contribOnce successfully installed, enable PostgreSQL (to start automatically upon system boot) and verify the status using the commands below:
sudo systemctl enable postgresql> sudo systemctl status postgresql
● postgresql.service - PostgreSQL RDBMS
Loaded: loaded (/lib/systemd/system/postgresql.service; enabled; vendor preset: enabled)
Active: active (exited) since Thu 2023-08-31 05:56:47 UTC; 1 month 8 days ago
Main PID: 15040 (code=exited, status=0/SUCCESS)
CPU: 2msSetup postgres
With the PostgreSQL installed on your server, we are ready to set up a new database and user for the SonarQube via the PostgreSQL shell.
Run the following command to log in to the PostgreSQL shell:-
> sudo -u postgres psql
psql (14.9 (Ubuntu 14.9-0ubuntu0.22.04.1))
Type "help" for help.

postgres=#
Now, run the following PostgreSQL queries to create a new database and user for SnonarQube.
Creates a new user named sonarqube and assigns it a strong password of your choice. It’s crucial to replace STRONG_PASSWORD with an actual secure password to enhance security.
postgres=# CREATE USER sonarqube WITH PASSWORD 'STRONG_PASSWORD';
Creates a database called sonarqube and designates sonarqube as the owner of this database. This ensures that the sonarqube user has control over the database.
postgres=# CREATE DATABASE sonarqube OWNER sonarqube;Grants all privileges on the sonarqube database to the sonarqube user. This step is essential to allow the user full access and control over the database, which is necessary for SonarQube to function properly.
postgres=# GRANT ALL PRIVILEGES ON DATABASE sonarqube TO sonarqube;Exit PostgreSQL console
postgres=# \qConfigure Sonarqube
Configure kernel system limit
To meet Sonarqube requirement, we must ensure that:
vm.max_map_countis greater than or equal to 524288fs.file-maxis greater than or equal to 131072- the user running SonarQube can open at least 131072 file descriptors
- the user running SonarQube can open at least 8192 threads
You can see the values with the following commands:
> sysctl vm.max_map_count
vm.max_map_count = 524288

> sysctl fs.file-max
fs.file-max = 131072

> ulimit -n
1024

> ulimit -u
15538
You can set them dynamically for the current session (temporary) by running the following commands:
> sudo sysctl -w vm.max_map_count=524288

> sudo sysctl -w fs.file-max=131072

> ulimit -n 131072

> ulimit -u 8192
To set these values more permanently, we must update either /etc/sysctl.d/99-sonarqube.conf and /etc/sysctl.conf to reflect these values.
sudo nano /etc/sysctl.confAdd the following configuration to the bottom of the line
vm.max_map_count=524288
fs.file-max=131072
Save the file and exit the editor when you are finished.
Now, run the sysctl command below to apply new changes on the /etc/sysctl.conf file.
> sudo sysctl --system
....
....
....
* Applying /etc/sysctl.d/99-sysctl.conf ...
vm.max_map_count = 524288
fs.file-max = 131072
* Applying /etc/sysctl.conf ...
vm.max_map_count = 524288
fs.file-max = 131072
Now, kernel system limit configuration has done. We can proceed to the next step.
Download Latest Version
Go the sonarqube github and find the latest version. Copy the version and download it using below link
https://binaries.sonarsource.com/Distribution/sonarqube/sonarqube-{LATEST VERSION}.zip
> cd ~
> wget https://binaries.sonarsource.com/Distribution/sonarqube/sonarqube-10.2.1.78527.zip
Unzip the download file to the desired location.
Create sonar user
Now, you will create a new user for SonarQube. Run the following command to create a new user ‘sonarqube’ on the server.
> sudo useradd -b /opt/sonarqube -s /bin/bash sonarqubeModify Properties
Upon acquiring the SonarQube package earlier, the initial steps involve configuring the SonarQube installation. This is achieved by making essential modifications to the default configuration file located at ~/sonarqube-10.2.1.78527/conf/sonar.properties after extract the download file.
In this step, we will need go through the process of adding PostgreSQL database details, defining the maximum memory heap for the Elasticsearch process and specifying the web host and port for the SonarQube service within this configuration file.
To commence the configuration, open the SonarQube configuration file using your preferred text editor; in this case, we’ll use the nano editor:
nano ~/sonarqube-10.2.1.78527/conf/sonar.propertiesThis action will provide you access to the SonarQube's main settings, where customization to match your specific environment takes place.
Within the sonar.properties file, locate the section dedicated to database settings. Here, you’ll incorporate the PostgreSQL database details. Input the database connection URL, username, and password to establish a seamless connection between SonarQube and your PostgreSQL database.
# Database configuration
sonar.jdbc.url=jdbc:postgresql://localhost:5432/sonarqube
sonar.jdbc.username=sonarqube
sonar.jdbc.password=STRONG_PASSWORD
Moving on, optimize the performance of the Elasticsearch process by allocating the maximum memory heap. This ensures efficient operation, especially in environments with large datasets.
# Elasticsearch settings
sonar.search.javaOpts=-Xmx512m -Xms512m -XX:MaxDirectMemorySize=256m -XX:+HeapDumpOnOutOfMemoryError
Adjust the values of ‘-Xms’ (initial heap size) and ‘-Xmx’ (maximum heap size) according to your system’s requirements.
Next, specify the host and port for the SonarQube service to ensure accessibility. Define the appropriate values based on your network configuration.
# Web server settings
sonar.web.host=0.0.0.0
# TCP port for incoming HTTP connections. Default value is 9000.
sonar.web.port=9000
After modify the properties, now its time to move the folder to the /opt/sonarqube folder.
sudo mv ~/sonarqube-10.2.1.78527 /opt/sonarqubeAnd change the ownership of the SonarQube installation directory ‘/opt/sonarqube’ to the user ‘sonarquba’ via the chown command as below.
sudo chown -R sonarqube:sonarqube /opt/sonarqubeCreate startup file
To streamline the management of SonarQube, configuring it as a systemd service is highly recommended. Create a systemd service file, typically named sonarqube.service and define the service parameters.
Run the following command to create a new systemd service file /etc/systemd/system/sonarqube.service.
> sudo nano /etc/systemd/system/sonarqube.serviceInsert the following content into the file:
[Unit]
Description=SonarQube service
After=syslog.target network.target

[Service]
Type=forking
ExecStart=/opt/sonarqube/bin/linux-x86-64/sonar.sh start
ExecStop=/opt/sonarqube/bin/linux-x86-64/sonar.sh stop
User=sonarqube
Group=sonarqube
Restart=always
LimitNOFILE=65536
LimitNPROC=4096

[Install]
WantedBy=multi-user.target
Save the file and exit the editor when you are done.
Now, reload the systemd manager by using the following command.
sudo systemctl daemon-reloadAfter that, start and enable the ‘sonarqube.service’ via the systemctl command below.
sudo systemctl start sonarqube.service
sudo systemctl enable sonarqube.service
Lastly, verify the sonarqube.service status using the following command and make sure its status is running.
[sudo] password for administrator:
● sonarqube.service - SonarQube service
     Loaded: loaded (/etc/systemd/system/sonarqube.service; enabled; vendor preset: enabled)
     Active: active (running) since Thu 2023-10-26 15:55:46 UTC; 2 weeks 1 day ago
   Main PID: 887915 (java)
      Tasks: 182 (limit: 4661)
     Memory: 1.9G
        CPU: 3h 41min 46.473s
     CGroup: /system.slice/sonarqube.service
             ├─887915 java -Xms8m -Xmx32m --add-exports=java.base/jdk.internal.ref=ALL-UNNAMED --add-opens=java.base/java>
             ├─887940 /usr/lib/jvm/java-17-openjdk-amd64/bin/java -Xms4m -Xmx64m -XX:+UseSerialGC -Dcli.name=server -Dcli>
             ├─888002 /usr/lib/jvm/java-17-openjdk-amd64/bin/java -Des.networkaddress.cache.ttl=60 -Des.networkaddress.ca>
             ├─888051 /usr/lib/jvm/java-17-openjdk-amd64/bin/java -Djava.awt.headless=true -Dfile.encoding=UTF-8 -Djava.i>
             └─888227 /usr/lib/jvm/java-17-openjdk-amd64/bin/java -Djava.awt.headless=true -Dfile.encoding=UTF-8 -Djava.i>
Now that you have the SonarQube is running as a systemd service, you will install and set up a reverse proxy for the SonarQube that runs on localhost with the default port TCP ‘9000’.
Setting NGINX
After successfully configuring SonarQube, the next step involves optimizing its deployment by running it behind a reverse proxy. Utilizing a reverse proxy not only enhances security by shielding SonarQube from direct internet exposure but also facilitates easier management of SSL certificates and provides a centralized point for handling authentication.
In this guide, we’ll explore the process of running SonarQube with Nginx.
Install Nginx (if not already installed)
If Nginx is not installed on your system, use the package manager relevant to your operating system to install it. For instance, on Ubuntu, you can use:
> sudo apt update
> sudo apt install nginx nginx-extras
Configure Nginx as a Reverse Proxy
Create a new Nginx configuration file for SonarQube:
sudo nano /etc/nginx/sites-available/sonarqubeInsert the following configuration (HTTPS), adjusting the placeholders accordingly:
server {

    listen 443 ssl;
    listen [::]:443 ssl;

    server_name sonarqube.your_domain.com;
    access_log /var/log/nginx/sonar.access.log;
    error_log /var/log/nginx/sonar.error.log;
    proxy_buffers 16 64k;
    proxy_buffer_size 128k;

    client_max_body_size 100M;

    server_tokens off;

    location / {
        proxy_pass http://0.0.0.0:9000;
        proxy_next_upstream error timeout invalid_header http_500 http_502 http_503 http_504;
        proxy_redirect off;
        proxy_set_header Host $host;
        proxy_set_header X-Real-IP $remote_addr;
        proxy_set_header X-Forwarded-For $proxy_add_x_forwarded_for;
        proxy_set_header X-Forwarded-Proto http;
    }

    # SSL CERT
    ssl_certificate /etc/nginx/ssl/nginx.pem;
    ssl_certificate_key /etc/nginx/ssl/key.pem;
}
Don’t forget to replace “your_domain” with your actual domain.
Save the file and exit the editor when you are finished.
Next, activate the server block configuration ‘sonarqube’ by creating a symlink of that file to the /etc/nginx/sites-enabled directory. Then, verify your Nginx configuration files.
sudo ln -s /etc/nginx/sites-available/sonarqube /etc/nginx/sites-enabled/
sudo nginx -t
If you have proper and correct Nginx configuration files, you should see the output message such as “test is successfull”.
Lastly, run the following systemctl command below to restart the nginx service and apply the new server block configuration.
sudo systemctl restart nginxNow, SonarQube is securely accessible via your domain and Nginx acts as a reverse proxy, ensuring efficient traffic management and enhanced security for your SonarQube deployment.
Access Sonarqube
Launch your preferred web browser on your local machine or any device connected to the network and visit your sonarqube domain ex: https:://sonarqube.your_domain.com
Now you will get the SonarQube login page (like below). Input the default username and password admin/admin and click Login.

Once you logged in, you will be asked to set up a new password for Sonarqube. Replace the old password with new strong password and update!
Upon successful authentication, you’ll land on the SonarQube dashboard. This dashboard serves as the central hub for monitoring and improving code quality. It provides an overview of your projects, quality gate status, and other key metrics.
Finally, everything is setup! 🚀
Testing
Once the SonarQube platform has been installed, you’re ready to install a sonar scanner and begin creating projects. Follow the steps below
Install Sonar scanner
The SonarScanner is the scanner to use when there is no specific scanner for your build system.docs.sonarsource.com
For mac, either you can use download file or just using homebrew to install.
brew install sonar-scannerConfiguring your project
Create a configuration file in your project’s root directory called sonar-project.properties. This file allows you to customize how SonarQube analyzes and presents information about your code. The specific settings you need may vary depending on your project type and the programming language used. Refer to the SonarQube documentation for detailed information about the available configuration options.
Create Sonarqube project
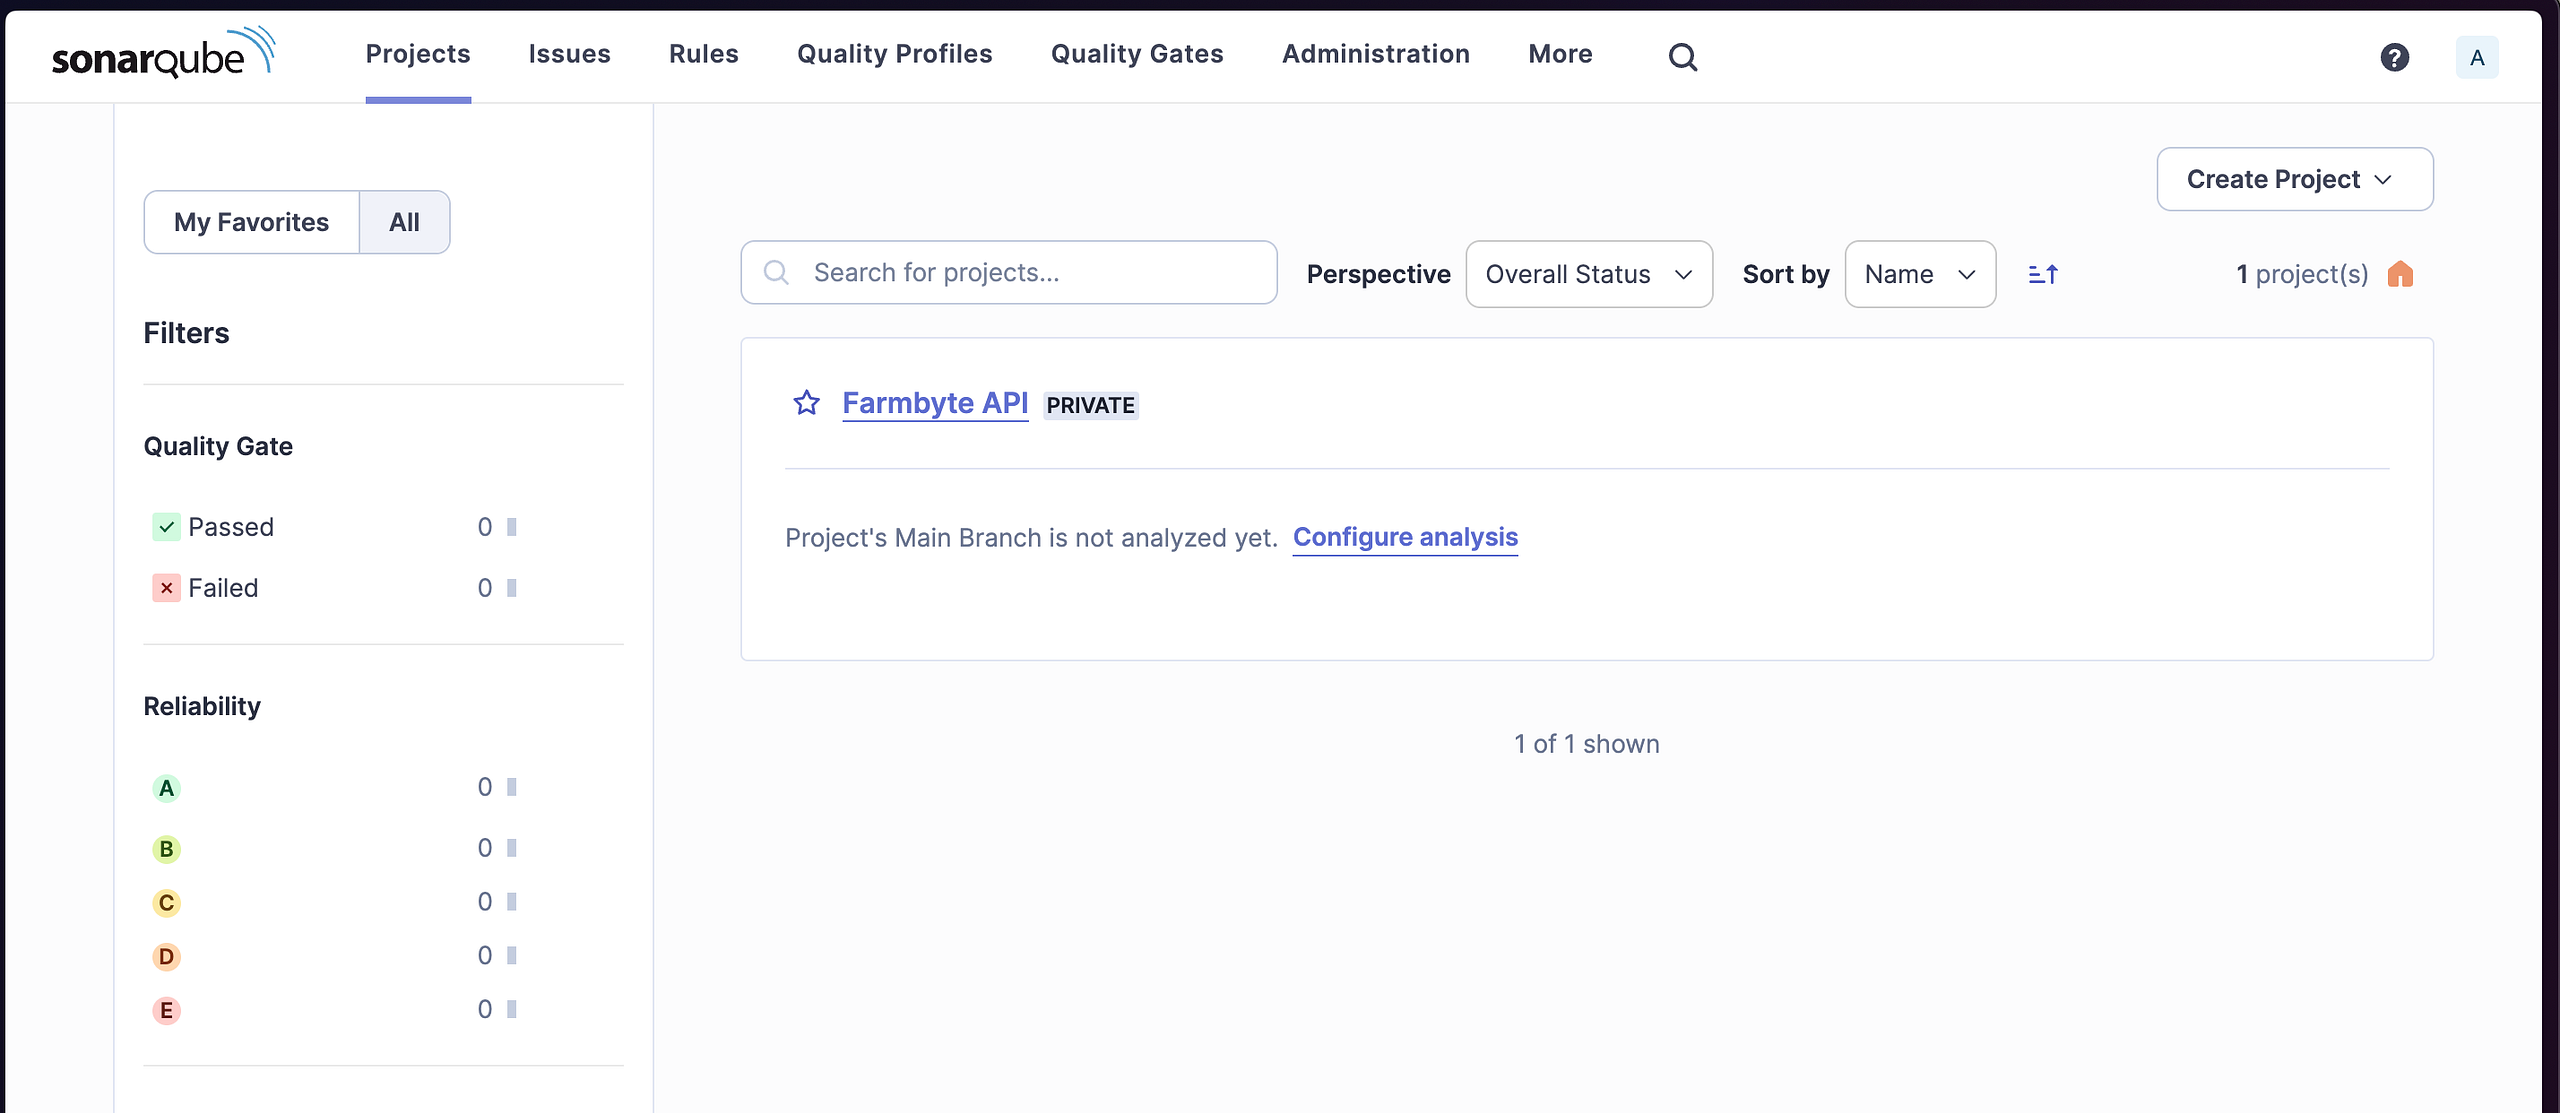
Go to your sonarqube portal and create new project
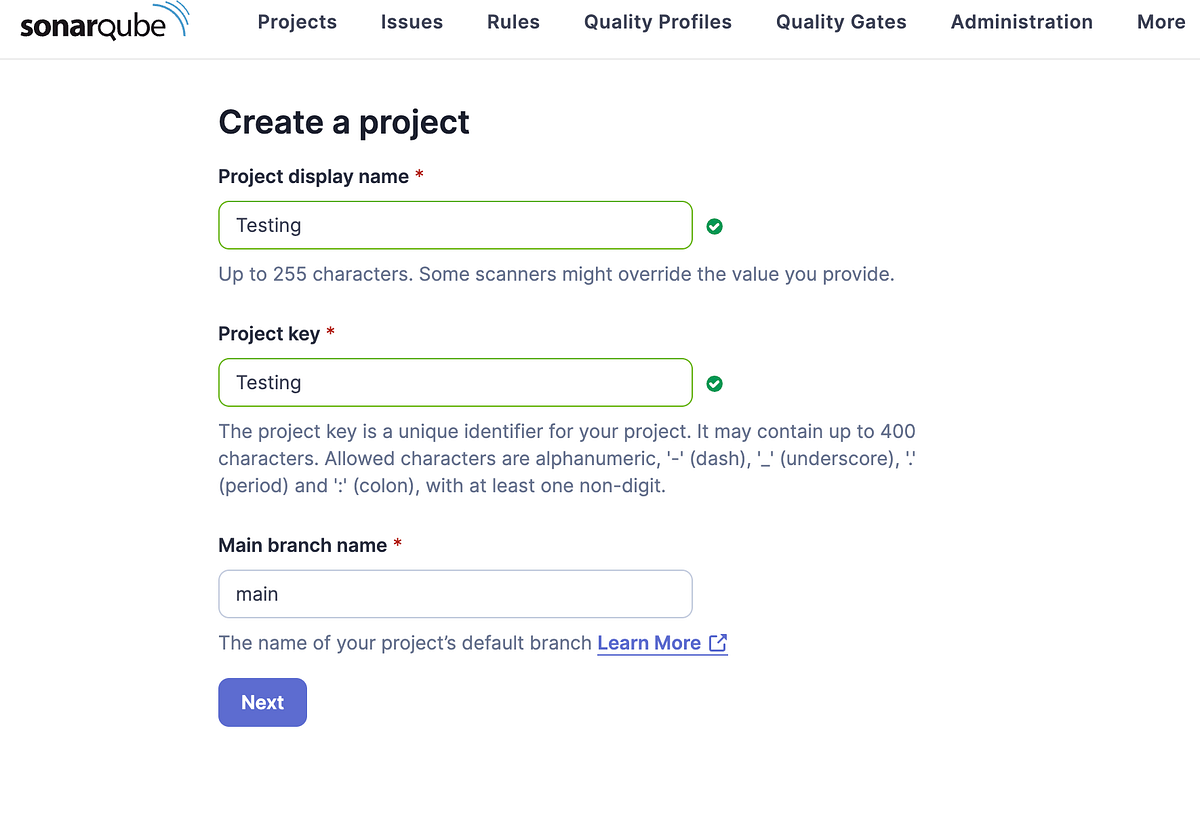
Enter your preferred name for the project and proceed to next page

Choose the global setting for the default configuration or you can play around with the settintg based on your needs
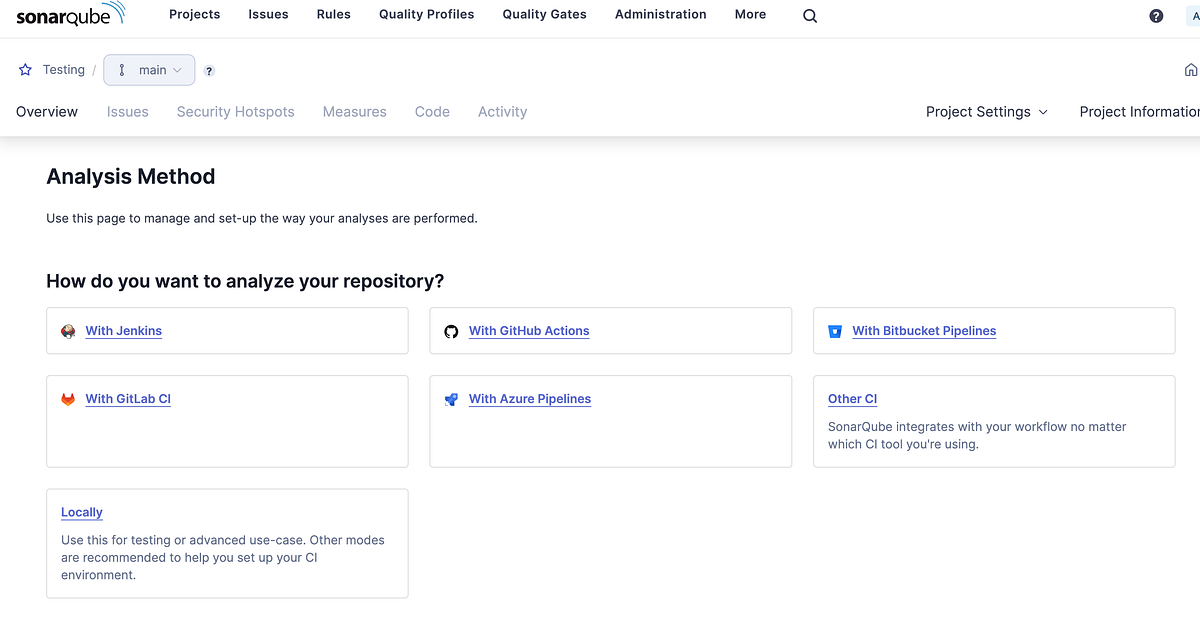
If you want to use more to streamline DevOps, you may configure the pipeline. Refer here. For this tutorial, we use the manually scanner at our local machine. Click on the Locally action

Generate a project token api and set the expiration period based on your needs and click Generate.
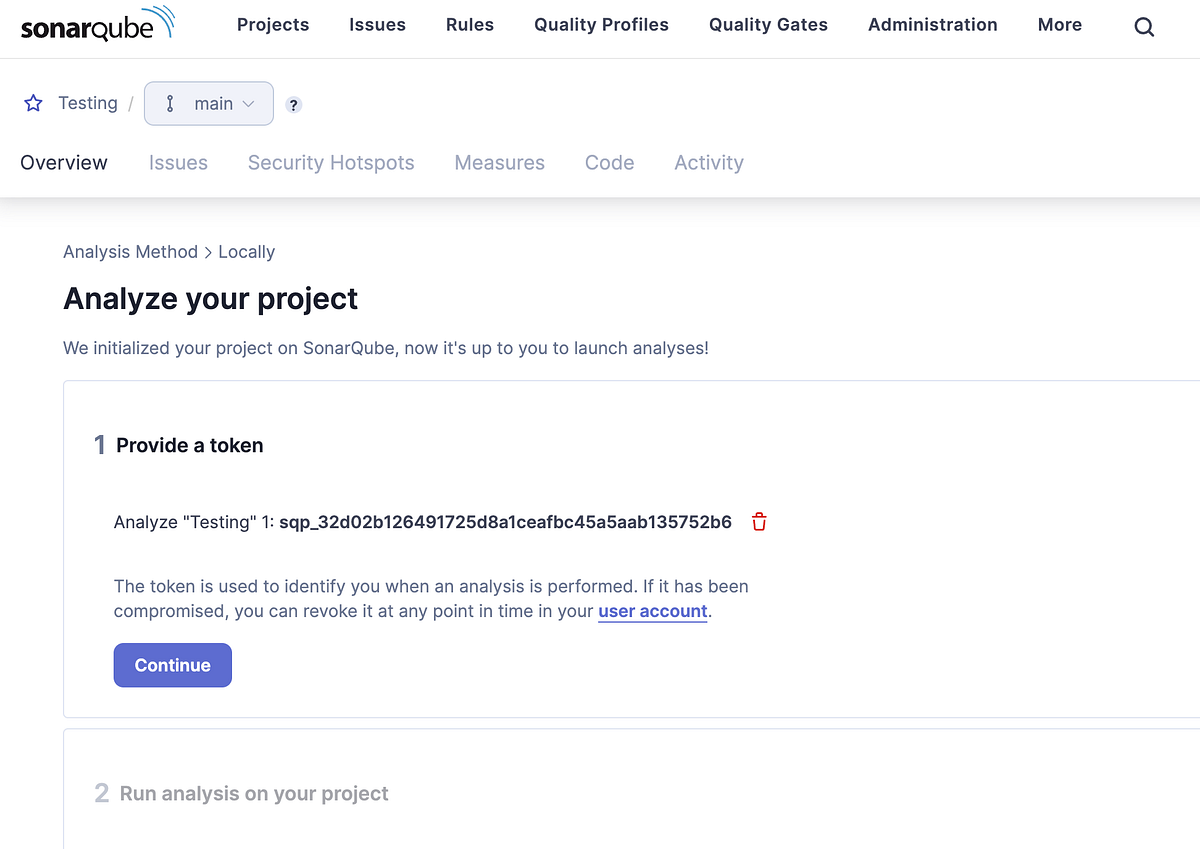
After that, you will be provided a token and store it properly because it only shows once.
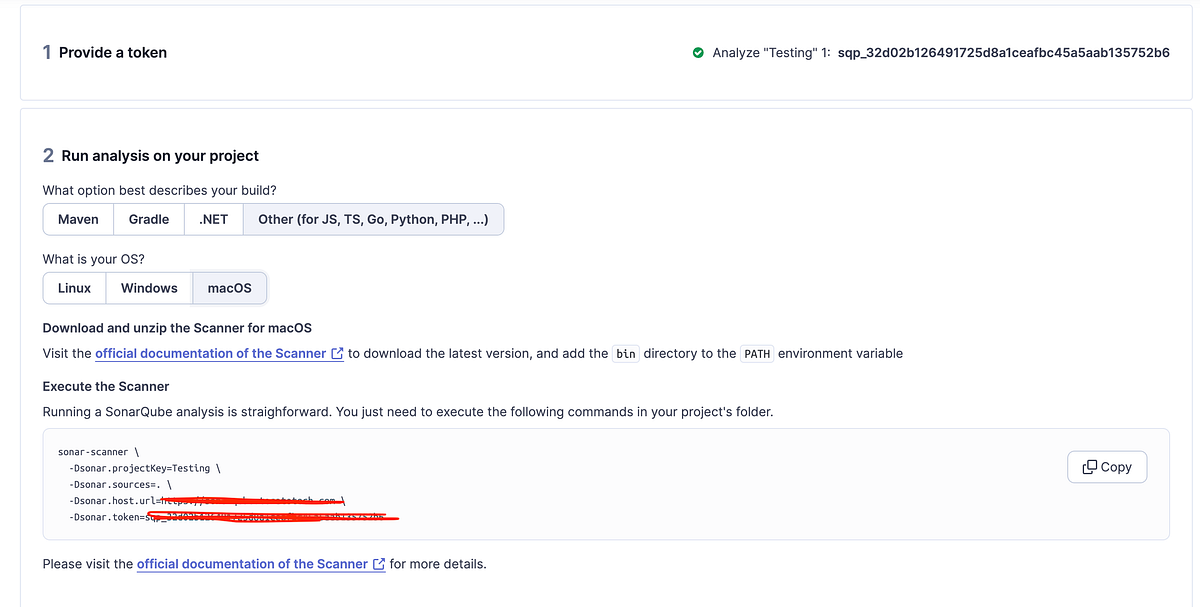
Choose your option the best to describe you build project. For this example, we use PHP and macOS as our scanner. Command line will be provided. Copy and paste at your project terminal and wait the scanner to finish. Once finished, return to the Sonarqube portal and see the results.

Upgrade Guide
Upgrading SonarQube is a straightforward process, but it requires careful planning to ensure a smooth transition. Here’s a step-by-step guide to help you navigate through the SonarQube upgrade process.
Review Release Notes
Before initiating the upgrade, thoroughly review the release notes of the target SonarQube version. This documentation provides important information about new features, bug fixes, and potential breaking changes.
Backup SonarQube Data (Optional)
As a precautionary measure, back up your SonarQube instance, including the database and file system. This ensures that you can revert to the previous state in case any issues arise during the upgrade.
Download the New SonarQube Version
Visit the official SonarQube github and download the desired version. Extract the downloaded archive to a temporary location.
> wget https://binaries.sonarsource.com/Distribution/sonarqube/sonarqube-NEW-VERSION.zipStop SonarQube
Before proceeding with the upgrade, stop the currently running SonarQube instance.
sudo systemctl stop sonarqubeUpdate SonarQube Configuration
Update the contents of sonar.properties file (in <NEW_SONARQUBE_HOME>/conf) with the settings in the <OLD_SONARQUBE_HOME>/conf directory (web server URL, database, ldap settings, etc.). Do not copy-paste the old files. If you are using the Oracle DB, copy its JDBC driver into <NEW_SONARQUBE_HOME>/extensions/jdbc-driver/oracle
Replace SonarQube Files
Copy the contents of the extracted SonarQube archive to the existing SonarQube installation directory, overwriting the existing files:
sudo cp -R /opt/sonarqube-<version>/* /opt/sonarqube/Start SonarQube and Run setup
Restart the SonarQube service to apply the changes:
sudo systemctl start sonarqubeBrowse to http://yourSonarQubeServerURL/setup and follow the setup instructions.