Implement Google ReCaptcha v3 in Laravel

What is Google’s ReCaptcha?
Google ReCaptcha is a Turing test system to protect a website or app from fraud and abuse without creating friction with the program. ReCaptcha uses advanced risk analysis and adaptive challenges to keep malicious software from engaging in abusive activities on your websites and applications
By implementing ReCaptcha, websites are protected from unwanted robot scripting. Users can continue to use the website or application such as making purchases, viewing pages or creating accounts and users who are unable to complete challenges will not be able to continue and will be blocked.
Why using V3?
ReCaptcha v3 will never interrupt your users, so you can run it whenever you like without affecting conversion. ReCaptcha works best when it has the most context about interactions with your site which comes from seeing both legitimate and abusive behaviour. For this reason, it is recommend including ReCaptcha verification on forms or actions as well as in the background of pages for analytics.
Implement in Laravel
Well, in this experiment we will try to add Google ReCaptcha V3 to a login form without using any composer captcha package.
Here are the steps for V3:
- Create a reCaptcha V3 account
- Add keys to config file
- Implement reCaptcha scripting at Login page
- Create a Laravel Rule
- Add Validation rule to Login logic
- Testing and validation
Lets get started
Create a reCaptcha account
In this step we need to set google site key and secret key. If you don’t have it, we must first register a new site at this link before we can use Google ReCaptcha.
Skip this step if you already create one.

You can put any label you desired as long as you remember. For the reCaptcha type, please choose V3. For the domains, if you are developing in the localhost, put “localhost” or “127.0.0.1”. The rest, it’s up to you who you want to assign. Then, submit the form.

After completing the registration process and clicking submit, we will be given a Site Key and Secret Key as shown in the image above. Save the the keys in the .env file later in the next step.
GOOGLE_RECAPTCHA_SITE_KEY=XXXX
GOOGLE_RECAPTCHA_SECRET_KEY=XXXX
Add keys to config file
Find a config file name services.php and add new lines with below code
<?php
return [
    ...
    'recaptcha' => [
        'site_key' => env('GOOGLE_RECAPTCHA_SITE_KEY'),
        'secret' => env('GOOGLE_RECAPTCHA_SECRET_KEY'),
    ],
]
Implement reCaptcha scripting at Login page
Now, we need a hidden input to put value after we get the token from the callback function. Unlike V2, it already render together. You can simply add a section in your form with below code
<input type="hidden" name="g-recaptcha-response" id="hidden-input"/>
and alter your submit button with this
<button data-sitekey="{{ config('services.recaptcha.site_key') }}"
        data-callback='onSubmit'
        data-action='login'
        class="g-recaptcha">
    Log In
</button>
Then, put below javascript at the bottom of the page or any desire place
<script src="https://www.google.com/recaptcha/api.js"></script><script>document.getElementById('hidden-input').value = token;
function onSubmit(token) {
document.getElementByTagName("form").submit();
}
</script>
Based on the script, it will automatically render once you click the submit button. If you want to customize, you may refer here.
Here is the sample login page i made based on Laravel Jetstream and Fortify
If you have successfully place the script, it should display a floating badge like this
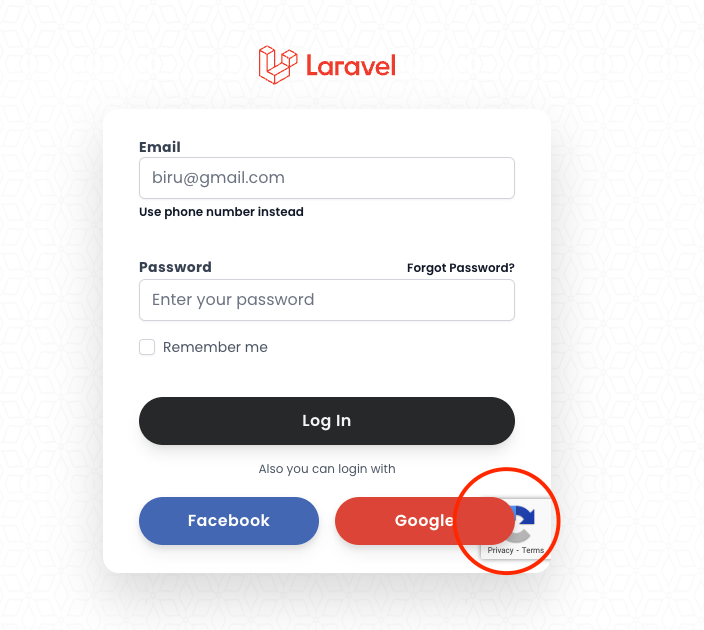
It is quite annoying to show the badge floating in the page. We can easily hide it with a CSS
.grecaptcha-badge { visibility: hidden; }And the badge are gone. But there is condition where Google mention that in here
You are allowed to hide the badge as long as you include the reCAPTCHA branding visibly in the user flow
So basically you should always have such legal information legally checked before doing anything.
Now, Lets say we dump the request, we should see g-recaptcha-response appended along with form input.
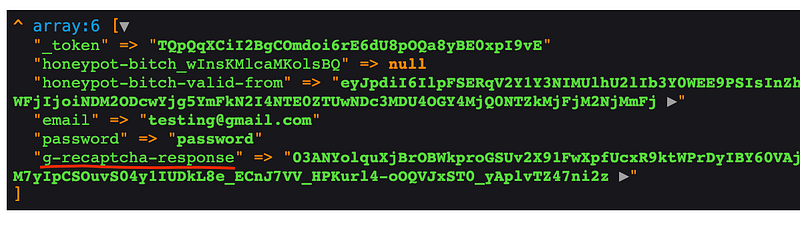
Now, we can proceed to validate the token which is valid or not.
Create a Laravel Rule
Based on documentation, each ReCaptcha response token is valid for 2 minutes and can only be verified once to prevent replay attacks. If you need a new token, you need to refresh or re-run the ReCaptcha verification.
Plus, ReCaptcha v3 returns a score which 1.0 is very likely a good interaction, 0.0 is very likely a bot. Based on the score, it will give us the customization to decide which threshold we preferred.
After you get the response token, you need to verify it within 2 minutes with ReCaptcha using the following API to ensure the token is valid.
https://www.google.com/recaptcha/api/siteverify (GET)
Only 2 parameter are required
secret - Secret Key.
response - Token fromg-recaptcha-response
And the response should be like below
{
    success: true | false,
    score: 0.9,
    action: 'login',
    error-codes: [refer here]
}
Now we know validation step, lets create a validation rule name ReCaptchaRule
php artisan make:rule ReCaptchaRule
And paste the below code.
class ReCaptchaRule implements Rule
{
    ....
    /**
     * Determine if the validation rule passes.
     *
     * @param  string  $attribute
     * @param  mixed  $value
     * @return bool
     */
    public function passes($attribute, $value)
    {
        $response = \Http::get("https://www.google.com/recaptcha/api/siteverify", [
            'secret' => config('services.recaptcha.secret'),
            'response' => $value
        ]);
        if ($response->json('score') < 0.7) {
            // your action if needed
        }
        return $response->json('success');
    }
    /**
     * Get the validation error message.
     *
     * @return string
     */
    public function message()
    {
        return 'Unable to validate recaptcha token';
    }
}
Note that, ReCaptcha learns by seeing real traffic on your site. For this reason, scores in a staging environment or soon after implementing may differ from production. As ReCaptcha v3 doesn’t ever interrupt the user flow, you can first run ReCaptcha without taking action and then decide on thresholds by looking at your traffic in the admin console.
Add Validation rule to the Login logic
Add extra validation in your controller logic to use the ReCaptchaRule
public function login(Request $request)
{
    ....
    $request->validate([
        'g-recaptcha-response' => ['required', new ReCaptchaRule]
    ]);
    ...
}
For more convenience, i recommended to put any validation in the Request class, so that your controller won’t get messy
Testing and validation
By the time you submit the form, you will be able to utilize the ReCaptcha functionality successfully. If it is not working, i suggest you to debug or dump the request from the verification API to see the error messages or error codes provided in the response.
Just like that. Simple~ Hope it helps
References
Found this helpful?
If this article saved you time or solved a problem, consider supporting — it helps keep the writing going.
Originally published on Medium.
View on Medium