Today’s pick is fairly the first article about Flutter app. Many apps nowadays let the user’s know the way they function and explain the services to users through the images and proper descriptions on landing pages and these pages are shown only on app start up. Usually and mostly, walkthrough are only visible only once when the app is installed and from next time only splash screen is shown.
Flutter is an open-source UI software development kit created by Google. It’s used to develop applications for Android, iOS, the web, etc. Flutter apps can be written in the Dart programming language.
Let’s Start
In this article, we will create a simple walkthrough based on kitajaga.co walkthrough design.
Create a project folder for this tutorial
> flutter create walkthrough_example && cd walkthrough_example
Flutter will generate basic empty project with default main.dart file.
void main() {
  runApp(const MyApp());
}

class MyApp extends StatelessWidget {
  const MyApp({Key? key}) : super(key: key);

  // This widget is the root of your application.
  @override
  Widget build(BuildContext context) {
    return MaterialApp(
      title: 'Flutter Walkthrough App',
      debugShowCheckedModeBanner: false,
      theme: ThemeData(
        // This is the theme of your application.
        //
        // Try running your application with "flutter run". You'll see the
        // application has a blue toolbar. Then, without quitting the app, try
        // changing the primarySwatch below to Colors.green and then invoke
        // "hot reload" (press "r" in the console where you ran "flutter run",
        // or simply save your changes to "hot reload" in a Flutter IDE).
        // Notice that the counter didn't reset back to zero; the application
        // is not restarted.
        fontFamily: 'Inter',
        primarySwatch: Colors.blue,
      ),
      home: const MyHomePage(title: 'Flutter Demo Home Page'),
    );
  }
}
Ok now, let’s create a stateful widget walkthrough screen. Create a file in lib directory named walkthrough_screen.dart
Create an empty Scaffold widget. Because of the design doesn’t need toolbar, we can ignore the rest attributes and focus on body.
Usually, walkthrough behaviour normally behave like slider, right? In Flutter, the widget we can use is PageView widget. It’s the same like ViewPager in Android.
A PageView is a widget which generates scrollable pages on the screen. This can either be a fixed list of pages or a builder function which builds repeating pages.
There are 2 ways the usage of PageView
PageView with specific children widgets
PageView with builder widgets
In this tutorial, i would use PageView.builder because i would like it to be dynamic from the set of array lists. Furthermore, the design shows the similarity look-alike between pages. Here, we can save our time by using single widget file rather than multiple screen widget for similar design.
So, we can create a reusable dart file named walkthrough_item.dart.
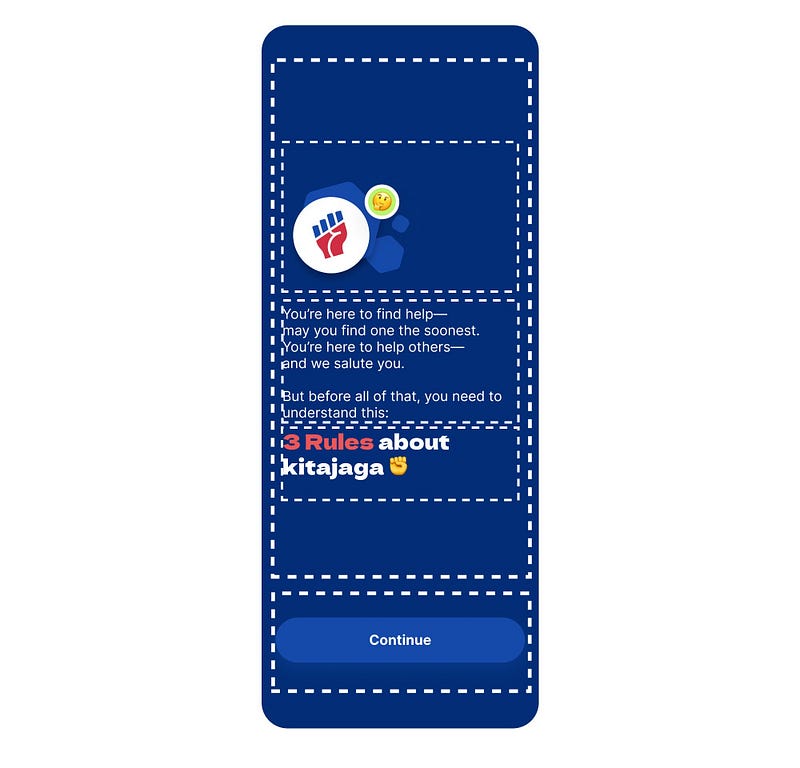
Source: kitajaga.co walkthrough design
Referring to the design, the only different is the walkthrough title is located at the bottom of walkthrough description. Lets create a pseudocode for the logic
IF position == 0
   Widget Image
   Widget Description
   Widget Title
   Widget Button
ELSE
   Widget Title
   Widget Image
   Widget Description
   Widget Button
Let’s start with a Container widget in walkthrough_item.dart. Put a Column widget because the design layout is a column layout. So lets partition the design.
So, when we translate the partition, the root widget will be look like below
Based on the snippet, since we want to put the button to last position of the page, we can use Expanded widget. You can see this Walkthrough Item Stateful widget constructor, there is some parameters where we need to pass from PageView.builder to this Widget.
So, combine with the simple pseudocode logic, the full walkthrough_item.dart code will look like this
Ok now, the Walkthrough Item is finished. Lets continue to finish off walkthrough_screen.dart
When use PageView, to control the page, we need PageController. Initialize the controller at the _WalkthroughScreenState. Set the initialPage of the PageView to 0 so that the Walkthrough will start at the first page
This _controller will be pass to the WalkthroughItem widget, so that we can trigger actions to navigate the PageView pages.
In Scaffold widget, add below PageView.builder widget at the body of the Scaffold. Finally the code will look like below,
Based on code above, we blocked the PageView slide gesture behaviour using NeverScrollableScrollPhysics because we want the user to click the button.
You might notice that there is WALKTHROUGH_ITEMS constant. The constant consists lists of Walkthrough description for each item. So, let’s create a constant data.
Create a dart file named static.dart and put below sample data in the file.
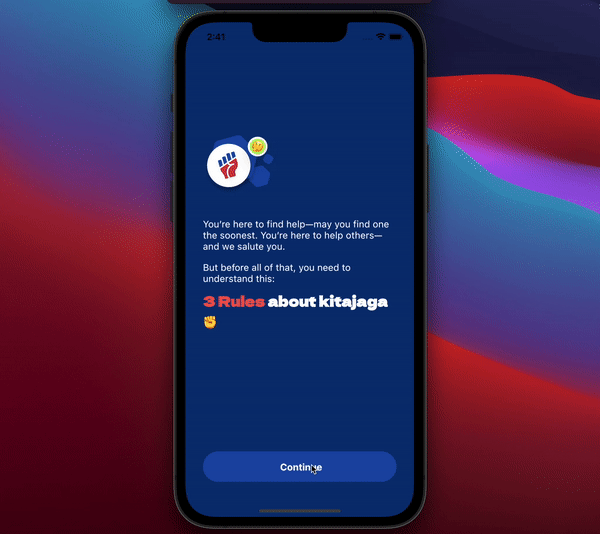
List<Map<String, Object>> WALKTHROUGH_ITEMS = [
  {
    'image': 'assets/images/wt1.png',
    'button_text': 'Continue',
    'description_rich': RichText(text: TextSpan(children: [
      TextSpan(
        text: 'You’re here to find help—may you find one the soonest. You’re here to help others—and we salute you.\n\nBut before all of that, you need to understand this:',
          style: TextStyle(fontWeight: FontWeight.w400, fontSize: 16)
      )
    ])),
    'title': RichText(text: TextSpan(children: [
      TextSpan(text: '3 Rules ', style: TextStyle(fontWeight: FontWeight.bold, fontSize: 24, fontFamily: 'Gothic', color: Color.fromRGBO(235, 87, 87, 1))),
      TextSpan(text: 'about kitajaga ✊ ', style: TextStyle(fontWeight: FontWeight.bold, fontSize: 24, fontFamily: 'Gothic')),
    ])),
  },
  {
    'image': 'assets/images/wt2.png',
    'button_text': 'I\'m not a spammer',
    'description_rich': RichText(text: TextSpan(children: [
      TextSpan(
          text: 'You’re cool—but excessive pinning isn’t cool. Requesting help repeatedly will end up restricting your entire experience. So please, hold your horses, limit your pins, and be patience 👌',
          style: TextStyle(fontWeight: FontWeight.w400, fontSize: 16)
      ),
    ])),
    'title': RichText(text: TextSpan(children: [
      TextSpan(text: 'Spammers ', style: TextStyle(fontWeight: FontWeight.bold, fontSize: 24, fontFamily: 'Gothic', color: Color.fromRGBO(235, 87, 87, 1))),
      TextSpan(text: 'will meet our sandals', style: TextStyle(fontWeight: FontWeight.bold, fontSize: 24, fontFamily: 'Gothic')),
    ]))
  },
  {
    'image': 'assets/images/wt3.png',
    'button_text': 'I\'m not a scammer',
    'description_rich': RichText(text: TextSpan(children: [
      TextSpan(text: 'We are actively monitoring scams on Kitajaga. All scam activities and related information will be reported to MCMC & Malaysian Authority. Go ahead, try us 🙃',
          style: TextStyle(fontWeight: FontWeight.w400, fontSize: 16)
      )
    ])),
    'title': RichText(text: TextSpan(children: [
      TextSpan(text: 'Scammers ', style: TextStyle(fontWeight: FontWeight.bold, fontSize: 24, fontFamily: 'Gothic', color: Color.fromRGBO(235, 87, 87, 1))),
      TextSpan(text: 'will be prost—we mean, prosecuted', style: TextStyle(fontWeight: FontWeight.bold, fontSize: 24, fontFamily: 'Gothic')),
    ])),
  },
  {
    'image': 'assets/images/wt4.png',
    'button_text': 'I\'ll double check everything',
    'description_rich': RichText(text: TextSpan(children: [
      TextSpan(text: 'You’re a good person—we know. But sons-of-benches out there are breaking the first two rules already! Always do your best assessment before helping. Beware of donation or payment scams. ',
          style: TextStyle(fontWeight: FontWeight.w400, fontSize: 16)
      ),
      TextSpan(text: 'Only do bank transfer if you trust those you send money to 👍', style: TextStyle(fontWeight: FontWeight.bold, fontSize: 16)),
    ])),
    'title': RichText(text: TextSpan(children: [
      TextSpan(text: 'Always, ', style: TextStyle(fontWeight: FontWeight.bold, fontSize: 24, fontFamily: 'Gothic')),
      TextSpan(text: 'double check everything', style: TextStyle(fontWeight: FontWeight.bold, fontSize: 24, fontFamily: 'Gothic', color: Color.fromRGBO(235, 87, 87, 1))),
    ])),
  }
];
Since all the walkthrough asset and detail is just static data, thats why we can design the output and put it on the list. So that, the PageView builder widget looks very clean.
Now, back to the main.dart. Replace the home value with WalkthroughScreen and we good to go.
Finally, run flutter command
> open -a simulator.app //for mac ios simulator (optional)
> flutter run
So here the output,
Walkthrough Done!
Congratulations! Try to implement this into your projects or improve the code.