
Nowadays social media is very popular and most favourite customer experience to use social media as their authentication in many websites. The moment you allow users to login using their social media profile, you can skip the validating process of their email because the social media provider already verified them. Hence, It gives a better user experience as users don’t need to create and remember their login credentials for your website. It also saves your time from building a verification flow.
In this article, we will discuss step by step on how to integrate Google Login in Laravel using Laravel Socialite. Laravel Socialite package handles flow for social login without hassle — pretty simple.
Without further ado, let’s get started.
Create Migration File
For fresh Laravel project, if you are not migrating yet, you can edit the users migration file. To integrate social login in the application, we need to add 2 more columns which is social_provider_name and social_provider_id to the user migration file.
social_provider_name indicate — the name of the social media
social_provider_id indicate — the unique id for user social media account
Your migrations will look like this.
Schema::create('users', function (Blueprint $table) {
    $table->id();
    $table->string('name');
    $table->string('email')->unique()->index();
    $table->timestamp('email_verified_at')->nullable();
    $table->string('social_provider_name')->nullable();
    $table->string('social_provider_id')->nullable();
    $table->string('password')->nullable();
    $table->rememberToken();
    $table->foreignId('current_team_id')->nullable();
    $table->string('profile_photo_path', 2048)->nullable();
    $table->timestamps();
});
For existing project, you may create a migration file to alter the users table. Your migrations will look like this
Schema::table('users', function (Blueprint $table) {
    $table->string('social_provider_name')->nullable();
    $table->string('social_provider_id')->nullable();
});
Installation
Now install the Laravel socialite package for google login. You may run the command below
composer require laravel/socialite socialiteproviders/googleNow, we need to add new configuration in environment file and also service configuration file.
Alter .env file and add below keys at the bottom of the file
GOOGLE_CLIENT_ID=
GOOGLE_CLIENT_SECRET=
GOOGLE_REDIRECT_URI=
Alter config/services.php file and add below array
'google' => [
    'client_id' => env('GOOGLE_CLIENT_ID'),
    'client_secret' => env('GOOGLE_CLIENT_SECRET'),
    'redirect' => env('GOOGLE_REDIRECT_URI')
],
Setup Google Credential Account
To make it work, we need Client ID and Client Secret Key from Google. Let’s create a credential. Say if you don’t have a google app account, it’s time to create one from here Google Developers Console.
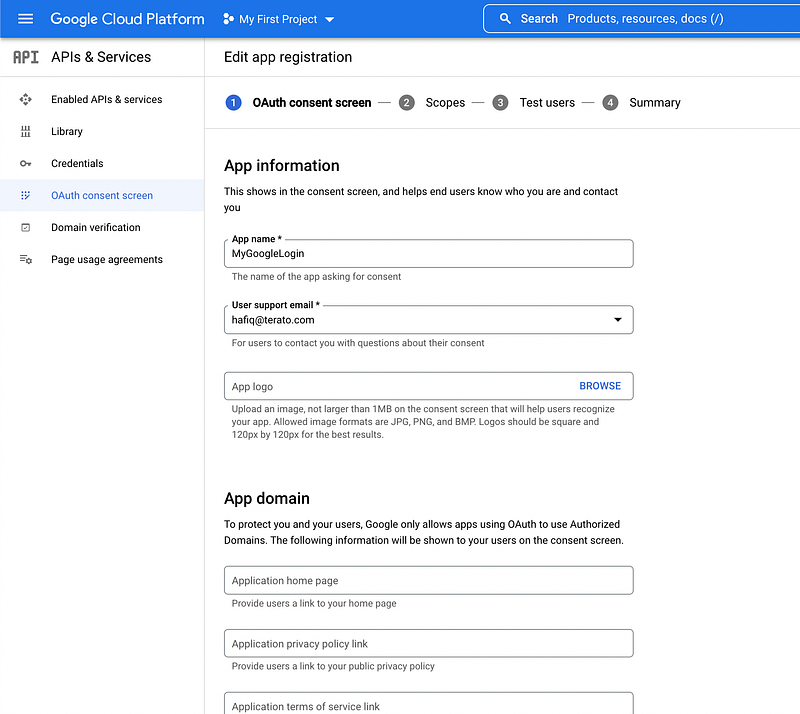
First you must go to the OAuth consent screen. It’s required for google for you to make declaration of the google login flow

Fill in the App Information detail. Just fill the mandatory field for fast creation.
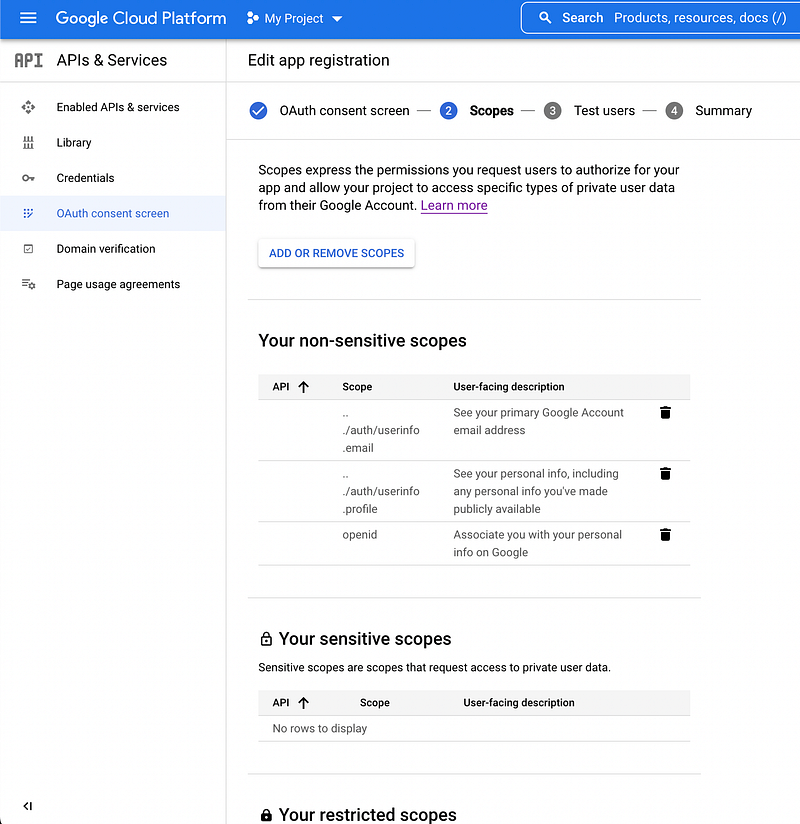
Fill in your required scopes. I would suggest just tick those 3 things which the basic information you want for your system
Just save and continue to fill in information that you think you want to fill in. After that, go to the Credentials page and create new credentials for OAuth client ID

Fill in the form correctly. Here, we have to mention the redirect URL just as mentioned in the below screenshot

For this tutorial, we will use redirect callback URL as
http://localhost:8010/socialite/auth/google/callback
Why we need redirect callback? It is because users will be redirected to this path after they have authenticated with Google. You can add many redirect URL such as for Production URL, Staging URL and for your local URL. The path will be appended with the authorization code for access, and must have a protocol. It can’t contain URL fragments, relative paths, or wildcards, and can’t be a public IP address.

Once you save the form, the OAuth client will be created and popup for you to copy. Copy the Client ID, Client Secret and callback URL and replace it in your .env file
GOOGLE_CLIENT_ID=XXXXXX
GOOGLE_CLIENT_SECRET=XXXXXXX
GOOGLE_REDIRECT_URI=http://localhost:8010/socialite/auth/google/callback
Create Socialite Controller and Routes
Next, we will create a controller to handle to routes.
- Route for trigger the google login
- Route for receiving callback information from google redirect URI
php artisan make:controller GoogleSocialiteController
The controller will look like this
class GoogleSocialiteController extends Controller
{
    public function handle(Request $request)
    {

    }
    public function handleCallback(Request $request)
    {

    }

}
Referring to the socialite documentation, it pretty simple approach. We can just add the piece of socialite handle code into our controller
public function handle(Request $request)
{
    return Socialite::driver('google')->redirect();
}
public function handleCallback(Request $request)
{
     $sUser = Socialite::driver('google')->user();
}
Now, as you can see handleCallback method handle the user information from google callback URI. Let’s create a logic from the user that we received. You might want IF authenticated user is not exist yet in the database, you can create automatically. IF exist, then we update the information and auto-login them.
public function handleCallback(Request $request)
{
     $sUser = Socialite::driver('google')->user();
     $user = User::query()->whereEmail($sUser->getEmail())->first();
     if (!$user) { // IF not exist
         $user = User::create([
              'name' => $user->getName(),
              'email' => $user->getEmail(),
              'profile_photo_path' => $user->getAvatar(),
              'social_provider_id' => $user->getId(),
              'social_provider_name' => 'google',
              'email_verified_at' => now(),
         ]);
     } else {
        $user->update([
              'name' => $user->getName(),
              'email' => $user->getEmail(),
              'profile_photo_path' => $user->getAvatar(),
              'social_provider_id' => $user->getId(),
              'social_provider_name' => 'google',
         ]);
     }
     return redirect()->login('dashboard')->withMessage('Login Success');
}
The controller logic is finished. Now we need to register the routes. Open web.php or any routes where your system located,
Route::prefix('socialite')->group(function () {
Route::get('auth/google/authenticate', [GoogleSocialiteController::class, 'handle'])
->name('connect')->middleware('signed');
Route::get('auth/google/callback', [GoogleSocialiteController::class, 'handleCallback']);
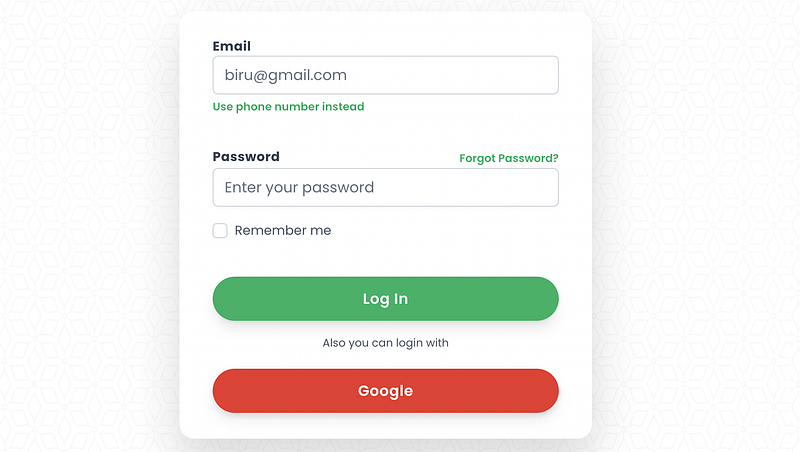
});Lastly, Create a button
<a href="{{ URL::signedRoute('connect', ['google']) }}">
        Google
</a>
You may put it in login page where user able to reach the button like this sample page below
At this point, you might be able to logged in using your google account. If you encounter any errors, may drop a comment or google it 😅. That’s all guys! Thanks for your time
References
Found this helpful?
If this article saved you time or solved a problem, consider supporting — it helps keep the writing going.
Originally published on Medium.
View on Medium