Bloating codes in single place would be devastating. It would be tons of duplication and unreadable codes which give your code maintainer a headache 😅.
So, i would cover how i go with Slim Controller and Fat Model
Skinny Controller basically means move all business logic, database logic and non response related logic to somewhere else and leave the controller clean and neat.
Fat Model basically means put only database related logic in the model instead of controller and make it as reusable method.
Don’t get me wrong. Fat Model doesn’t actually fat. I would prefer less fat than bloated model
There are some approach to implement this

Move Business Login In Repository
As mention in a lot of articles, repository pattern works as a bridge between models and controllers. If you don’t want to cluttered your model and controller with tons of business logic, using repository should be good enough. For more info, you can refer here
Most of repository pattern use interface to create methods. But i prefer to create a class as a base class. Why? i don’t want to repeat same query all over again to all repository. Here is sample of my base class
From this BaseRepository class, i only need to pass a Model in constructor. Let’s create UserRepository
and since Laravel already have Automatic Injection, in Controller, we just put at constructor.
As we can see, UserRepository is clean from basic query logic. So, you can focus to put all business logic in it.
Make use of Route Model Binding
Use route model binding as necessary because it uses dependency injection to automatically find the model instance from the route.
It will turn from this
public function index(Request $request, $id)
{
      $user = User::find($id);
      $user->update($request->all());
}
into this
public function index(Request $request, User $user)
{
      $user->update($request->all());
}
“I have a lot of logic to filter. That’s why i cant use route model binding”. Don’t worry. You can custom your own route binding by using Route::bind and place it in RouteServiceProvider
Route::bind('user', function($value) {
    return User::query()->active()->findOrFail($value);
});
Laravel itself provide many features out of the box. All you need to do is try and error 😜. Please read Laravel doc about route model binding. They already explained.
Make best use of Model
There is tons of benefits can be use in the Model. Let’s take a look what we can benefit from. Many thing you can do in model like scoping, observers, events, mass assignment, traits, mutators, etc..
Query Builder
Usually we’ll see developers use like this
DB::table('users')->get();Don’t recommended it. Instead write like this
create a trait name DBQuery
How to use?
Mode::useQuery()->get();
Or if you don’t want to use custom trait, you can directly use like example below.
Mode::query()->getQuery()->get();
Scopes
You can avoid using same query logic by using Scope. Scope have 2 types — Global and Local scope. One of example use global scope is Soft Delete where it automatically append you query.
Lets see how local scope works

There is very much repetition query there. Let’s scoping it,
With this in place, we need to rewrite the queries to use scopes.
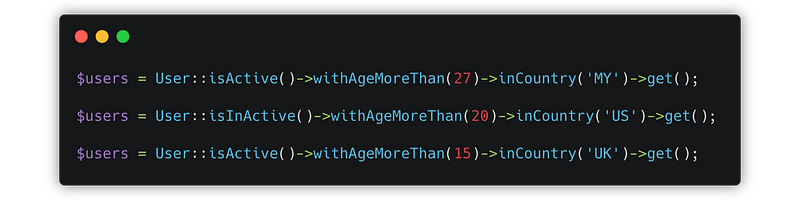
Its nice right? Much more human readable and cleaner. You can chain it with other query and also can use with eager load.
Observer
Observer will decouple your CRUD logic without messy your controller. How it works? The observer will listen every changes of your Model and automatically fired to the registered event.
“Eloquent models dispatch several events, allowing you to hook into the following moments in a model’s lifecycle:retrieved,creating,created,updating,updated,saving,saved,deleting,deleted,restoring,restored, andreplicating.”
It’s very recommended to use especially in big project. Here is the example:
Let’s say before/after you create or update, you want to execute several code.
But after we use Observer, the controller will look like this
Where do all the logic go? It’s the observer do the rest of your after commit logic.
Mass Assignment
Mass assignment means save all input with one line. For example, its turn from this
$post = new Post;
$post->title = "hello";
$post->description = "Here i am";
...
...
...
$post->save();
into this
$post = Post::create($request->all());
But there is vulnerability in this method and you should not use $request->all(). Why? Usually developers will use mass assignment and fill all the related fillable in their mode. IF your fillable variables contain sensitive information, attackers can modify your current data.
Instead use $request->only() / $request->except() / $request->validated(). These method will filter out non-required fields from modifying unintended data
Append Attribute
Append works as adding attributes to the serialized JSON while you do not have a corresponding column in your database.
For example, you have a user and there is status which in database refer as 1,2,3. When you print out the json, you want to translate the 1,2,3 value into more readable words.

into this
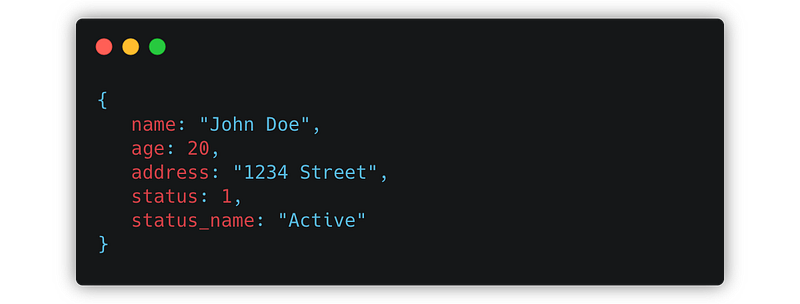
How? Add the attribute name to the appends property of your model.
Make use of FormRequest
In Laravel, there is a class called FormRequest that mainly used for request validation. But in bigger picture,FormRequest come in handy when validating complex logics ex: user permission, request input filtering, custom message, data manipulation, etc..
You can simple create by artisan command, lets say create request class named as UserFormRequest
php artisan make:request UserFormRequest
First we look authorize() method. This is where the part you should do validation related to user. No need to do redundant checking in Controller if you can do here.
public function authorize()
{
    return $this->user()->can('create user');
}
Next, look into rules() method. This is where you put all your rules. Don’t cluttered your rules with long logic. Use php artisan make:rule instead.
return [
    'full_name' => ['required'],
    'username'  => ['required', new UsernameRule]
];
Usually, in controller, most of us used $request->all() to create or update. Some of us used $request->only([‘username’, ‘full_name’, 'email', 'age']. Why don’t we tidy a little more by making a new method named allowed() in UserFormRequest
public function allowed()
{
return$request->only([‘username’, ‘full_name’, 'email', 'age'];
}
You can create any logic in FormRequest to make it as reusable. Let’s say i give another sample
public function ageMoreThanFive()
{
    return $this->age > 5;
}
So, the UserFormRequest will looks like this
As full usage sample in controller will be like this
Hope this tips and tricks tutorial will be helpful for you. 😁
Thanks for your time~~